Welcome back to Color Culture, I am Salik Waquas, a full-time film colorist who loves his work. In this article, I will show you four different methods to color grade Arri Log C (AWG/Log C) in Davinci Resolve. Let’s get started.
Color Grade Arri Log C In Davinci Resolve (4 Methods)
Method 1: Color Grade Arri Log C Using Arri LUT
This method is straightforward and ideal for those seeking quick results. Here’s how to do it:
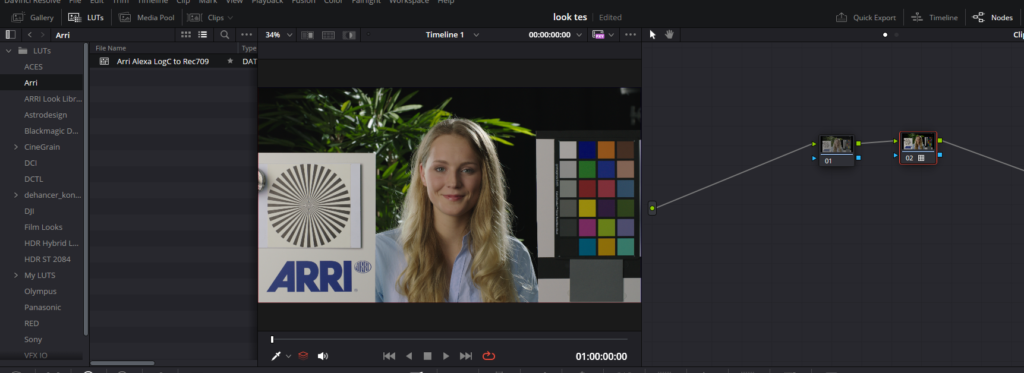
- Import your footage: Drag and drop your Arri-shot footage into the timeline on the Edit page.
- Switch to the Color page: Head over to the Color page in DaVinci Resolve.
- Create a new node: In the Node Graph (located in the top-right corner), right-click the existing node and select Add Node > Add Serial. This will create a new node for you to work on.
- Access LUTs: Select the new node, then click on the LUTs button (top-left corner). On the left-hand menu, scroll to find the ‘Arri’ folder.
- Apply the Arri LUT: Inside the Arri folder, double-click on ‘Arri Alexa LogC to Rec709’. This will immediately apply the LUT to your footage, giving it a Rec709 look.
- Refine the grade: Now that the LUT is applied, you can fine-tune your grade. Use the Lift, Gamma, and Gain wheels, or explore the Curves tool to manipulate colors further.
For the best results, remember that any adjustments made after applying the LUT should ideally happen in the node before it. This allows you to retain the integrity of the LUT while making targeted color corrections.
Method 2: Color Grade Arri Log C Using Color Space Transform
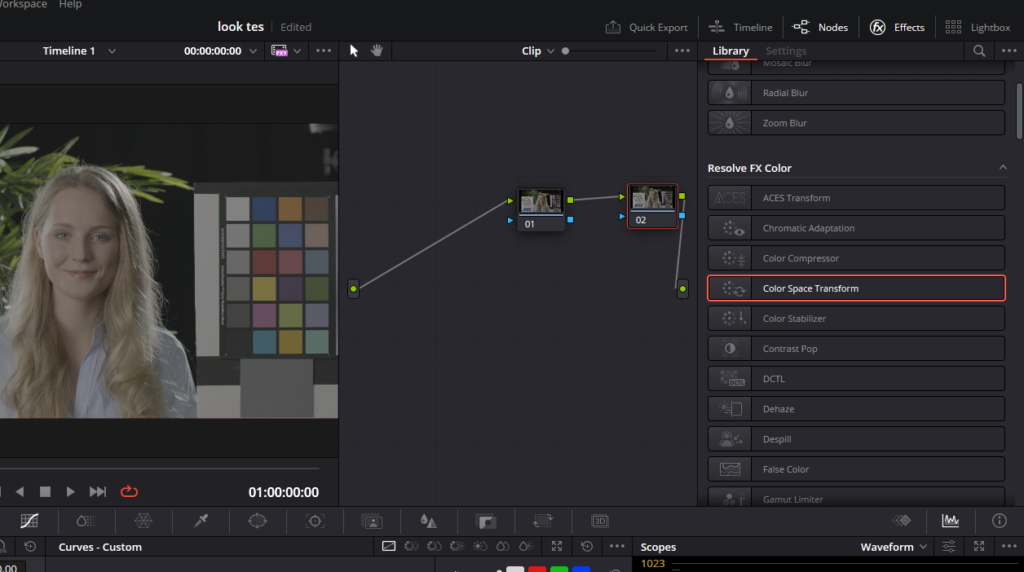
- Load your footage: With your Arri footage already in the timeline, navigate to the Color page in DaVinci Resolve.
- Create a new node: In the Node Graph (top-right corner), right-click on the current node and select Add Node > Add Serial. This will create a new node to apply the Color Space Transform.
- Open the Effects panel: Click on the Effects button (also top-right corner), then scroll down to find the Color Space Transform plugin. Drag and drop it onto the new node you just created.
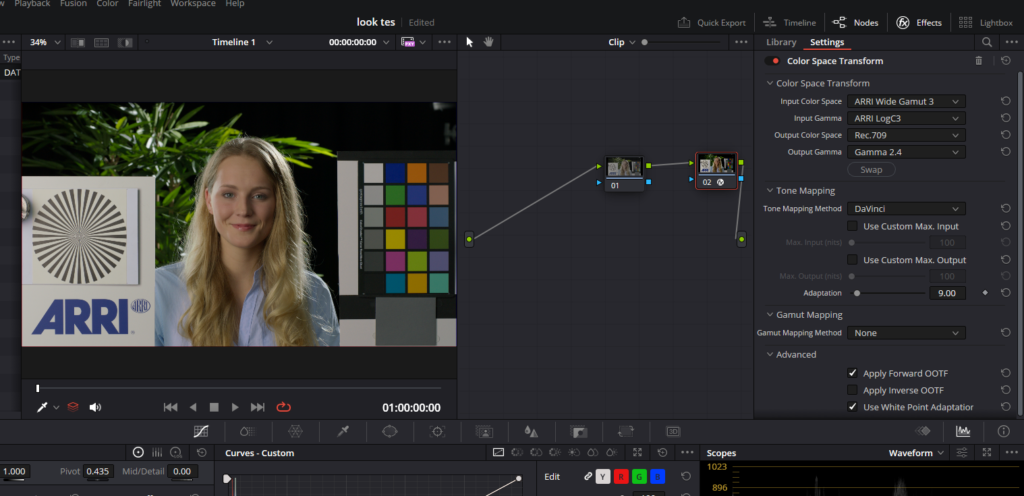
- Set the Input and Output values:
- In the Input Color Space dropdown, select Arri Wide Gamut 3.
- For Input Gamma, choose Arri LogC3.
- In Output Color Space, select Rec.709.
- For Output Gamma, choose Gamma 2.4.
- Fine-tune your grade: This will give you a base Rec.709 look to start your color grade. After applying the Color Space Transform, you can further refine your footage using the Lift, Gamma, and Gain wheels, or dive deeper into the Curves tool to tweak specific colors and contrast levels.
Method 3: Color Grade Arri Log C Using Davinci Resolve Color Management
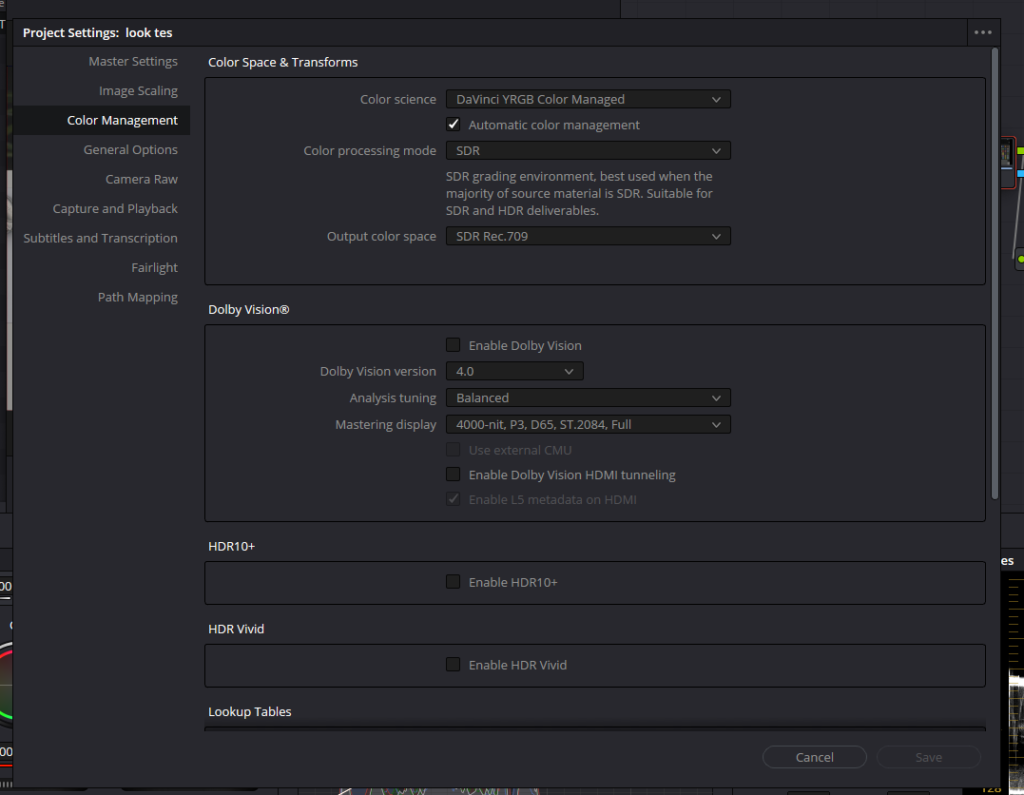
Now we’re moving into more advanced territory by using DaVinci Resolve Color Management to color grade Arri Log C footage. This method provides greater control over your entire workflow and ensures consistent color management from start to finish.
- Open the Project Settings: With your Arri footage in the timeline, switch to the Color page. Click the gear icon in the bottom-right corner to open the Project Settings window.
- Access Color Management settings: In the Project Settings window, click on Color Management from the menu on the left.
- Configure Color Science:
- In the Color Science dropdown, select DaVinci YRGB Color Managed.
- Ensure that the Automatic Color Management checkbox is ticked.
- Set Color Processing Mode and Output Color Space:
- Under Color Processing Mode, choose SDR.
- In the Output Color Space dropdown, select SDR Rec.709.
- Save your settings: Click Save to apply the changes.
- Fine-tune your grade: With these settings, DaVinci Resolve will automatically detect and color manage your Arri Log C footage, applying a base grade that converts your Log C footage to a Rec.709 look. Although DaVinci Resolve applies a base grade, you can refine it further using the Lift, Gamma, and Gain wheels, or adjust colors more precisely using the Curves tool.
Method 4: Color Grade Arri Log C Using ACES
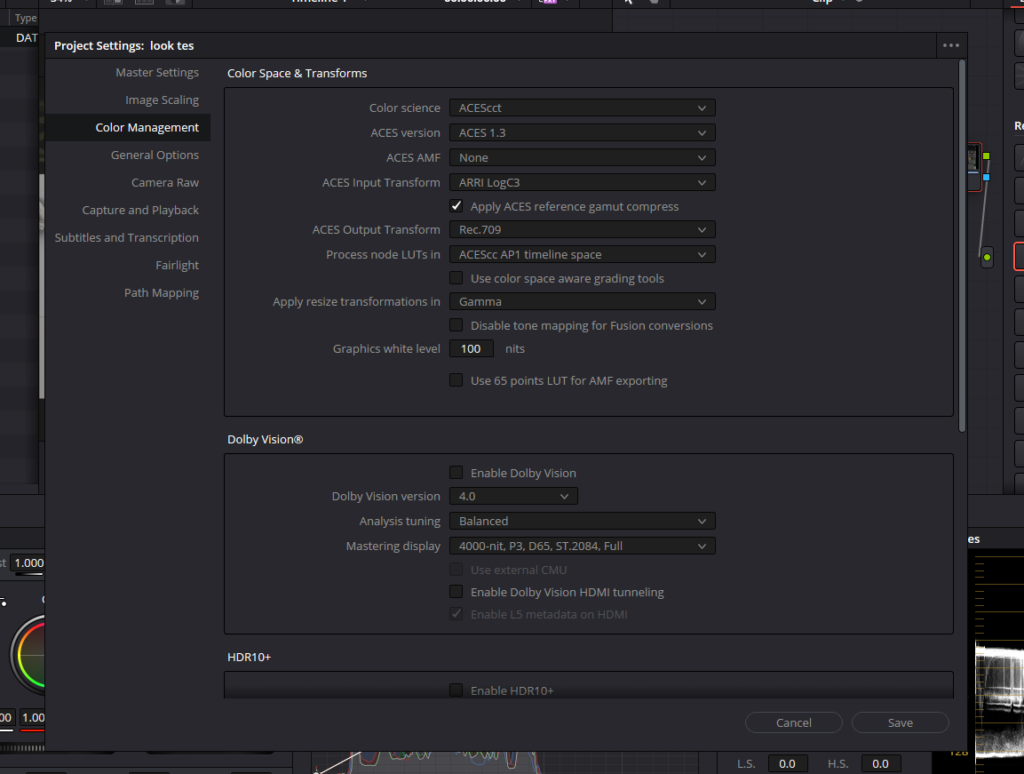
Our final method utilizes the ACES (Academy Color Encoding System), which is a highly professional and advanced color management system. This method ensures accurate color representation across various devices and platforms, making it perfect for high-end workflows.
- Open the Project Settings: With your Arri footage in the timeline, switch to the Color page in DaVinci Resolve. Click on the gear icon at the bottom-right corner to access the Project Settings window.
- Access Color Management settings: In the Project Settings window, click on Color Management from the left-hand menu.
- Configure ACES settings:
- In the Color Science dropdown, select ACEScct.
- Under ACES Version, choose ACES 1.3.
- Set Input and Output Transforms:
- In the ACES Input Transform dropdown, select Arri LogC3.
- In the ACES Output Transform dropdown, choose Rec.709.
- Save your settings: Click Save to apply these settings.
- Fine-tune your grade: With these configurations, DaVinci Resolve will use the ACES color management system to handle your Arri Log C footage, converting it into Rec.709 for viewing and grading. Although ACES applies a base grade, you can enhance it further using the Lift, Gamma, and Gain wheels, or get more granular control using the Curves tool for precise color adjustments.
ACES is ideal for high-end projects that require consistent color management across multiple formats and viewing conditions.
I hope this article has given you valuable insights into four different methods for color grading Arri Log C in DaVinci Resolve. As a full-time colorist, I’ve found each technique useful in different situations, depending on the project’s needs and the level of control I want over the final look.
- Also Read: Transcoding In Davinci Resolve: Simplest Guide
- Also Read: Making DCP In Davinci Resolve: Ultimate Guide
Browse Our Cinematography Analysis Glossary
Explore directors, cinematographers, cameras, lenses, lighting styles, genres, and the visual techniques that shape iconic films.
Explore Glossary →