Hello and welcome back to Color Culture, where we dive deep into color grading, post-production, and making your workflow easier and more efficient. I’m Salik Waquas, owner of Color Culture, and today I’m going to simplify the process of transcoding in DaVinci Resolve for you. Whether you’re a beginner or an experienced editor looking to refresh your skills, this guide will help you understand the benefits of transcoding and how to do it with ease.
What is Video Transcoding?
Transcoding is essentially converting footage from one video codec to another. Imagine you have a movie file that’s a bit cumbersome for your computer to handle while editing, and you want to make it easier on your processor. Transcoding allows you to store the same movie but in a different format, ultimately making it more efficient for playback and editing.
When you transcode, you’re taking the raw footage, feeding it into an encoder, and using a specific codec to create a new version of the video file. The encoder decides how the bits of data should be arranged on your disk for optimal use. One example would be transcode RED cameras .r3d files in ProRes.
There are several reasons why you might want to transcode:
- Improve Playback Performance: Some footage formats are very demanding on your processor, especially high-resolution RAW files. Transcoding can make it easier for your computer to read and playback the footage smoothly.
- Reduce File Size: Smaller files take up less disk space and can be transferred more easily across networks.
- Efficient Storage: You may need to store footage on a smaller drive, and transcoding to a more efficient codec can save space.
Understanding the Benefits of Transcoding
You might ask, “Why should I bother transcoding at all?” Well, if you’re finding your editing experience to be sluggish, it could be due to the type of video codec your footage is using. Some codecs, like H.264 or H.265, are highly compressed and therefore more difficult for your computer to play back in real-time. These codecs are designed to reduce file size at the expense of demanding more processing power during playback.
For instance, if you’re working with footage that was shot in 4K with a high compression codec, it might be too much for your computer’s processor, leading to lag and slow editing response. Transcoding the footage into a codec like ProRes or DNxHR, which is optimized for editing, will make it much easier for your system to handle.
How to Transcode Footage in DaVinci Resolve
Now, let’s dive into the practical steps of transcoding footage in DaVinci Resolve. This is a powerful tool, and it has different methods for making transcoding straightforward and effective.
Method 1: Media Management Transcoding
Let’s start by using the Media Management tool to transcode.
- Add Clips to the Media Pool: First, add the clips you want to work with to your media pool. You can do this by dragging them in or by using the “Import” option.
- Go to Edit Tab: Once your clips are in the media pool, switch to the Edit tab from the bottom. Here, you can arrange the clips in your timeline as needed.
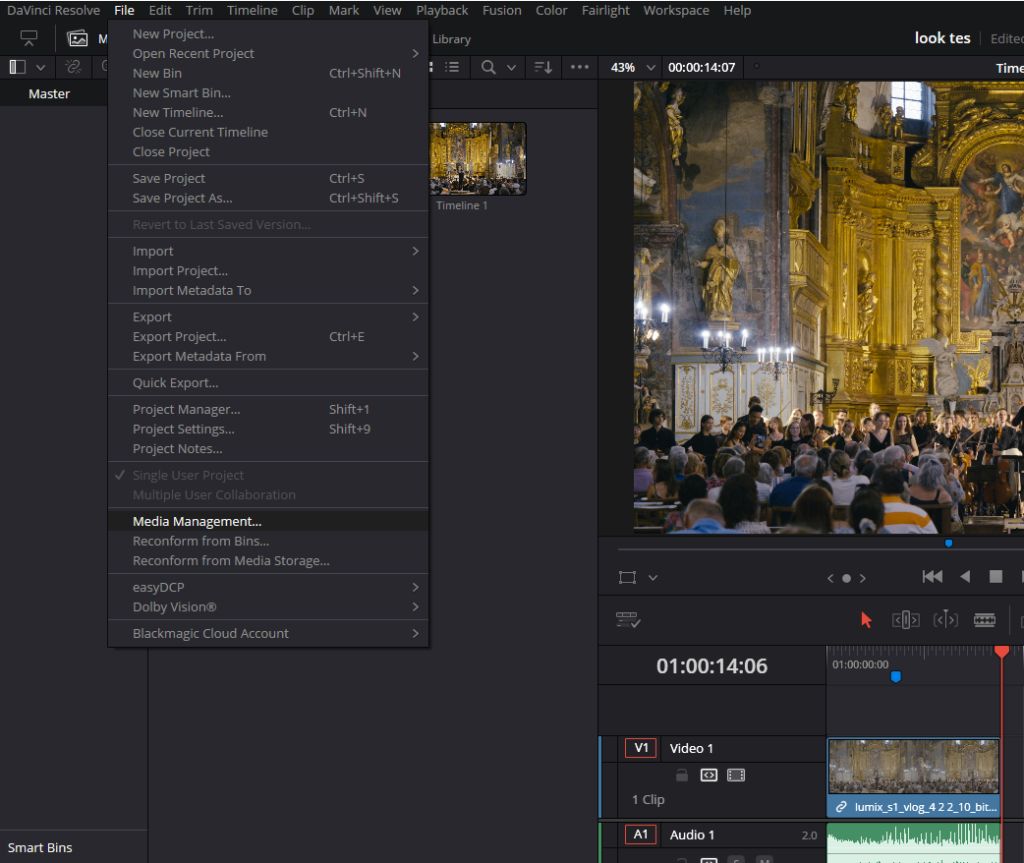
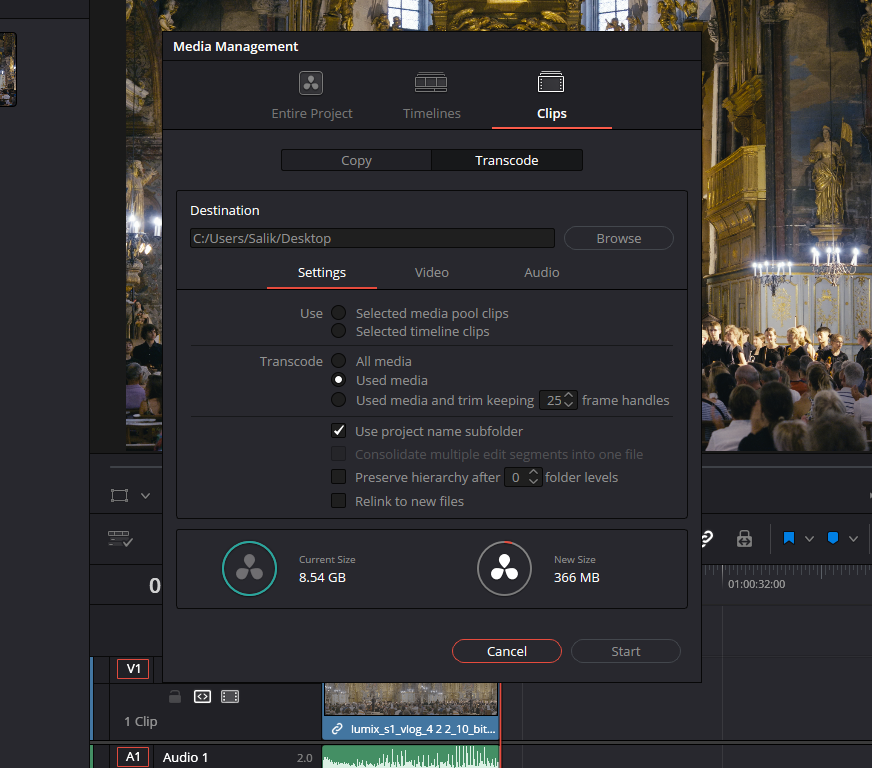
- Access Media Management: Click on File (from top menu) > Media Management. This opens a new window that gives you several options. You can choose to copy or transcode media. Select the Transcode option.
- Select Your Output Location: Now, you’ll want to choose where to save the transcoded files. Click on the Destination box to browse to a suitable location on your computer.
- Choose the Clips to Transcode: You can choose to transcode all the media, only the media used in the timeline, or selected clips. This flexibility allows you to only transcode what is necessary, saving both time and space.
- Select Codec and Format: Under the transcode option click on the Video tab. You’ll then select the desired codec. For editing, I often recommend using a codec like ProRes 422 or DNxHR, as these are optimized for editing and much easier on your processor.
- Start the Transcoding Process: Once you’ve made your selections, click Start. DaVinci Resolve will begin transcoding the footage. Depending on your computer’s processing power and the length of your footage, this process can take a few minutes to several hours.
After the transcoding is complete, you can link the new files back to your media pool and edit against the more lightweight versions, which should provide a smoother editing experience.
Method 2: Using Optimized Media
There’s actually an even easier way to handle transcoding in DaVinci Resolve, and that’s by generating optimized media. This method is perfect if you want to avoid the more manual process described above.
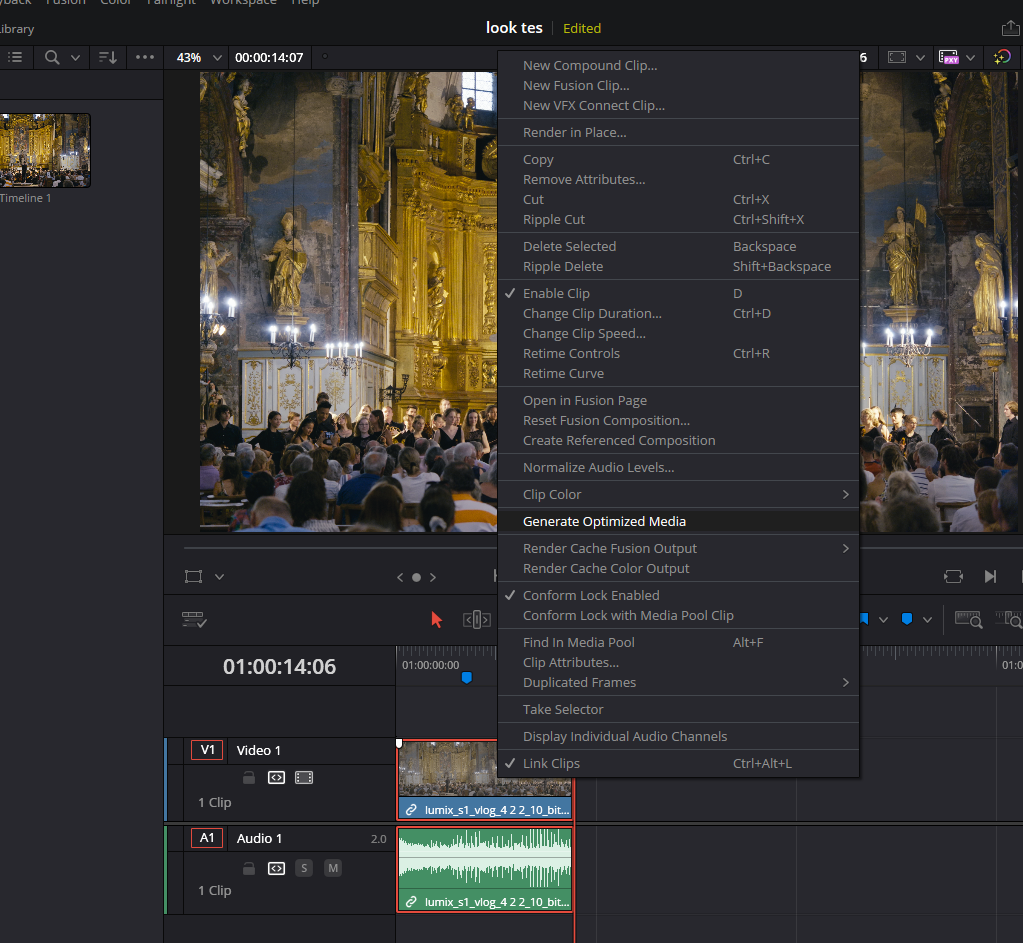
- Right-Click to Generate Optimized Media: In your media pool, simply right-click on the footage or clip you want to optimize and select Generate Optimized Media. If you’ve already placed footage on your timeline, you can do this from there as well.
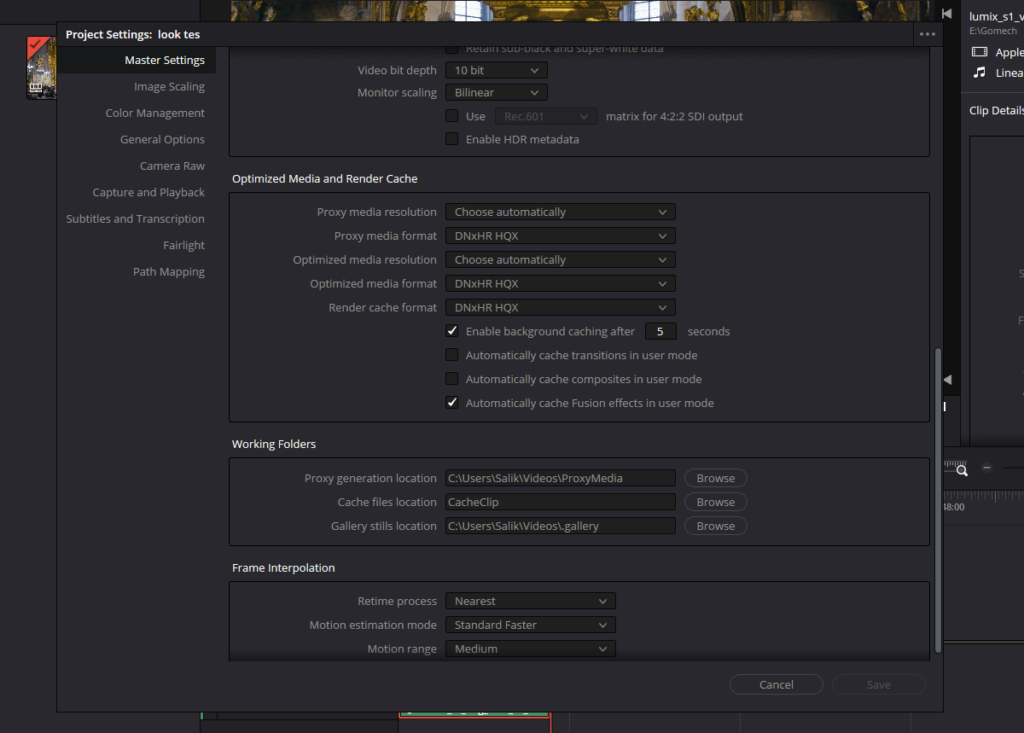
- Optimized Media Settings: You might wonder, “Where are all the options to customize the transcoding?” Well, the options for optimized media are found in your Project Settings.
- Go to Project Settings: Hit the gear icon in the lower right corner of the Davinci Resolve’s interface to access the project settings.
- Select Master Settings: In the Master Settings tab, look for the Optimized Media and Render Cache section.
- Choose the Format and Resolution: You can adjust the resolution and the codec used for optimized media. For instance, you might choose ProRes 422 or DNxHR and even reduce the resolution to make the footage easier to handle during the editing process. Use Optimized Media Resolution drop-down menu and Optimized Media Format drop-down menus to select your format and resolution.
- Editing with Optimized Media: Once optimized media is generated, DaVinci Resolve will use it in the background while you’re editing. This means faster scrubbing, better playback, and an overall smoother editing experience.
- Final Delivery: When it’s time to deliver your project, you have the option to use or ignore the optimized media. In the Delivery Tab, under Advanced Settings, you’ll find an option labeled Use Optimized Media. I recommend leaving this unchecked to ensure you render the final project using the original, high-quality footage rather than the lower-resolution optimized version.
Choosing the Right Codec for Transcoding
When choosing a codec to transcode to, you should consider your editing needs and your computer’s capabilities. Here are some popular codecs to consider:
- ProRes: A great choice for Mac users, as it offers high quality and is optimized for editing.
- DNxHR: Similar to ProRes but more suitable for Windows users. It provides a balance between quality and performance.
- Cineform: Another excellent codec that works well across platforms and provides good quality at manageable file sizes.
Conclusion
Transcoding might seem like an unnecessary extra step at first, but once you understand its benefits, it becomes an invaluable tool in your editing workflow. By converting footage to an editing-friendly codec, you’re freeing up your computer’s resources to focus on what really matters—crafting the best edit possible.
Whether you’re using the Media Management tool for a more hands-on approach or generating Optimized Media for a simpler solution, DaVinci Resolve makes transcoding accessible and efficient. It’s all about making the editing process smoother, reducing frustration, and ultimately saving time.
So the next time you find your computer struggling to keep up, give transcoding a shot. Your future self—sitting in front of a smoothly running timeline—will thank you for it.
- Also Read: Making DCP In Davinci Resolve: Ultimate Guide
- Also Read: Making a Vignette In Davinci Resolve (2 Methods)
Browse Our Cinematography Analysis Glossary
Explore directors, cinematographers, cameras, lenses, lighting styles, genres, and the visual techniques that shape iconic films.
Explore Glossary →