In the world of color grading, a 3×3 matrix is a fundamental tool that works on the red, green, and blue (RGB) channels of an image. It multiplies the RGB color values to create transformations between different color spaces or to creatively adjust your footage. Think of it as a way to control how each of the RGB channels influences the final output of all three channels.
Let me break it down a bit more simply: imagine you have three colored lights—red, green, and blue. A 3×3 matrix lets you adjust how much each light contributes to the final color of an image, allowing you to precisely manipulate the overall look and feel.
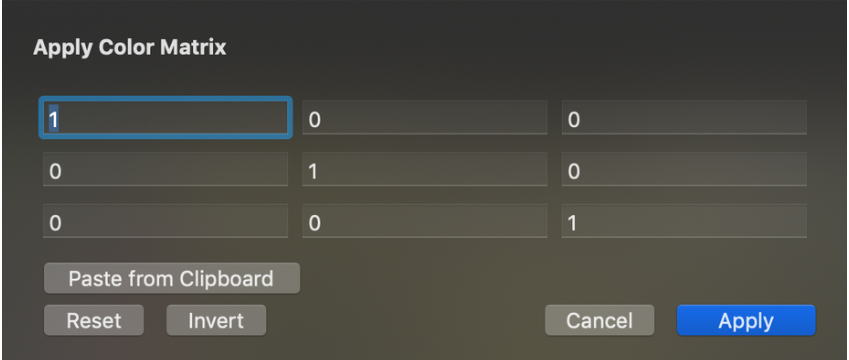
A standard 3×3 matrix looks like this:
- Row 1: 1, 0, 0
- Row 2: 0, 1, 0
- Row 3: 0, 0, 1
Here is the image representing the table:

This is an identity matrix, meaning no change is applied to the RGB channels. The identity matrix is essentially a “neutral” matrix where each color output remains the same as its input.
Using a 3×3 Matrix in DaVinci Resolve
You might be wondering: “Where is the 3×3 matrix tool in DaVinci Resolve?” Well, unlike some other programs (such as Nuke, where it’s called “ColorMatrix”), DaVinci Resolve doesn’t have a specific 3×3 matrix tool. Instead, we use the RGB Mixer to achieve the same effect.

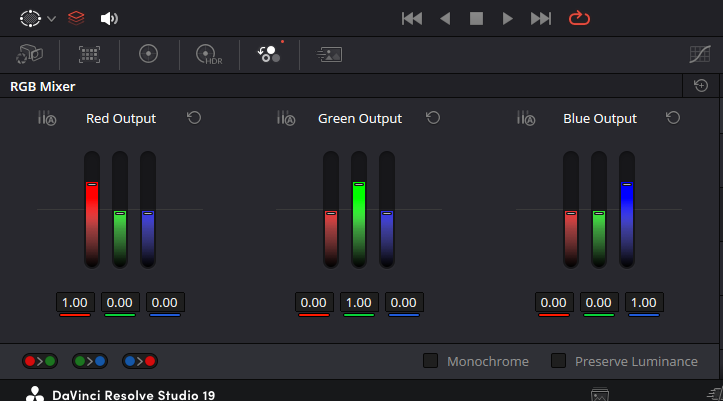
The RGB Mixer in DaVinci Resolve works in a similar way to a 3×3 matrix. The output channels are listed one below the other, starting with Red Output, followed by Green Output and Blue Output. You can adjust the contribution of each color channel to the final output by either typing values directly.
One key difference is that DaVinci Resolve uses only two decimal places, compared to eight decimal places in Nuke. For most creative work, this level of precision is enough, but if you’re using it for technical color management where absolute precision is crucial, you might need the higher accuracy offered by other software. In such cases, you can create the matrix in Nuke or Lattice, save it as a 3D LUT, and import it into DaVinci Resolve.
To get accurate results, it’s crucial to untick the “Preserve Luminance” option in the RGB Mixer. Otherwise, the adjustments you make might not translate accurately from other software.
Understading 3×3 Matrix
Now, let’s talk about how to use the 3×3 matrix creatively. By default, the RGB Mixer in Resolve looks like this:
Here is the table presented as a list:
- Output Red:
- Multiply Factors for Input Red: 1
- Multiply Factors for Input Green: 0
- Multiply Factors for Input Blue: 0
- Output Green:
- Multiply Factors for Input Red: 0
- Multiply Factors for Input Green: 1
- Multiply Factors for Input Blue: 0
- Output Blue:
- Multiply Factors for Input Red: 0
- Multiply Factors for Input Green: 0
- Multiply Factors for Input Blue: 1
Each row represents an output color channel—red, green, and blue. Each column represents the input contribution from the red, green, and blue channels. For example, the values in the “Output Red” row determine how the input red, green, and blue values contribute to the final red output.
If you want to create a unique look, you can start experimenting with the matrix. For instance, you could add some green to the red channel by entering a value like 0.123 in the “Green Input” column of the “Red Output” row. You could also reduce the blue contribution to the red output by entering a negative value in the “Blue Input” column of the same row.
This way, you can start to fill in each row to adjust each output channel. These values determine how much of each input color contributes to the final color. You can use the RGB Mixer not only for creative transformations but also for practical purposes, such as balancing shots that are difficult to match due to mixed or colored lighting.
Using a 3×3 Matrix for Technical Transformations
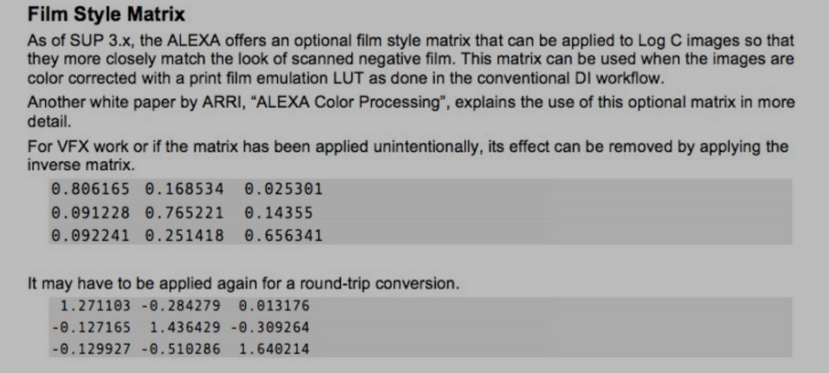
The 3×3 matrix isn’t just for creative looks—it’s also a powerful tool for technical color transformations. Let’s look at how to apply a technical transformation, like adding the ARRI Film Matrix to Alexa Log-C footage.
ARRI provided a film-style matrix that can be applied to Log-C footage to give it a color response similar to scanned film negative. This matrix is helpful when you’re working with footage that will be converted using a print film emulation (PFE) LUT, as it makes the colors more closely match the traditional film workflow.
Here are the values for the ARRI Film Matrix:
Here is the table presented as a list:
- Output Red:
- Multiply Factors for Input Red: 1.271103
- Multiply Factors for Input Green: -0.284279
- Multiply Factors for Input Blue: 0.013176
- Output Green:
- Multiply Factors for Input Red: -0.127165
- Multiply Factors for Input Green: 1.436429
- Multiply Factors for Input Blue: -0.309264
- Output Blue:
- Multiply Factors for Input Red: -0.129927
- Multiply Factors for Input Green: -0.510286
- Multiply Factors for Input Blue: 1.640214
Here is an image representing the table:

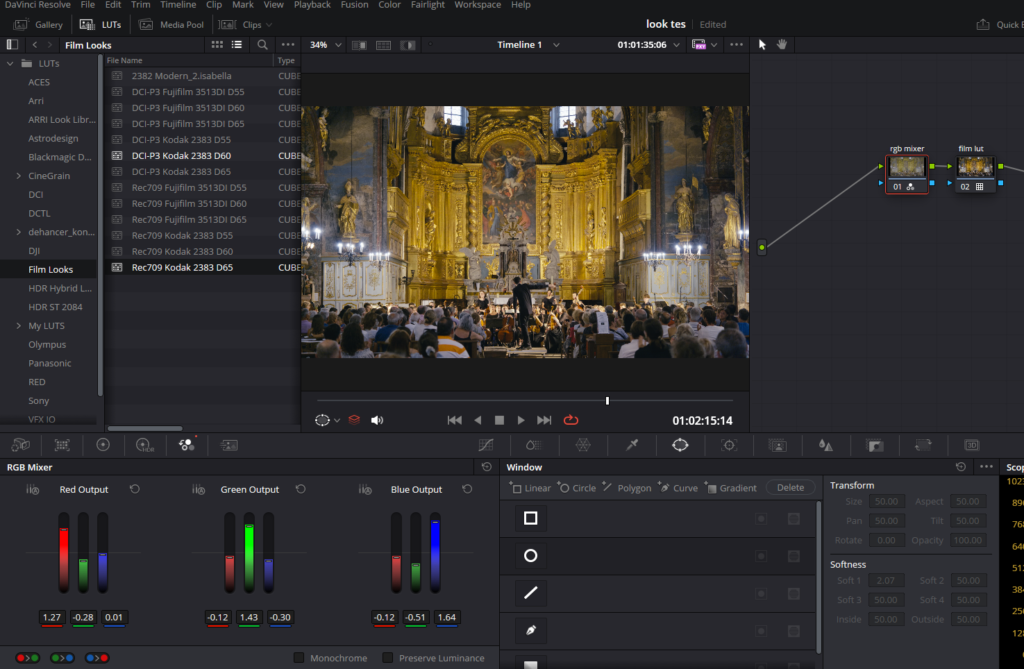
By entering these values into the RGB Mixer, you can replicate the ARRI film-style look. This matrix helps create greater color separation, making it easier to key certain colors.
Using the Arri FIlm 3×3 Matrix in DaVinci Resolve

To effectively utilize the arri film matrix in DaVinci Resolve, follow these step-by-step instructions:
- Open the RGB Mixer: Go to the Color tab, and find the RGB Mixer panel on the right. In your node graph, select the node where you want to apply the matrix adjustment.
- Input Values: Start modifying the values in the RGB Mixer according to the values given in the above table.
- Adjusting Other Outputs: After setting the values for the red output, continue filling in values for the green and blue outputs in their respective rows.
- After entering these values,make a new node and add a film look LUT that comes free with DaVinci Resolve, such as Kodak 2383 D55, you successfully applied a 3×3 matrix.
DCTL for Simplifying the Process
If you want to skip the hassle of manually entering values into the RGB Mixer, there’s a handy DCTL (DaVinci Color Transform Language) created by Paul Dore. This DCTL simplifies the process of using a 3×3 matrix by allowing you to apply transformations without manually adjusting each value in the RGB Mixer. You can find this DCTL here.
Also Read: Making a Vignette In Davinci Resolve (2 Methods)
Browse Our Cinematography Analysis Glossary
Explore directors, cinematographers, cameras, lenses, lighting styles, genres, and the visual techniques that shape iconic films.
Explore Glossary →