Ever since I first fell in love with the magic of movies, I’ve been obsessed with that classic widescreen look—the iconic cinematic black bars or some like to call it cinemascope. With over 10 years of experience as a colorist, I’ve experimented with every trick in the book, and today I’m here to share three foolproof methods for adding those cinematic black bars in DaVinci Resolve. Whether you’re aiming for a dramatic reveal or simply want your video to look more cinematic, I’ve got you covered. Let’s roll!
Method 1: Using Solid Color Layers
This method might seem like the “old-school” approach, but it’s great for when you want extra control—especially if you’re planning on animating the bars for a slick transition effect. Although I don’t usually recommend it for every project (because it’s a tad more work), it’s handy when you need precise keyframe control.
Step-by-Step Instructions:
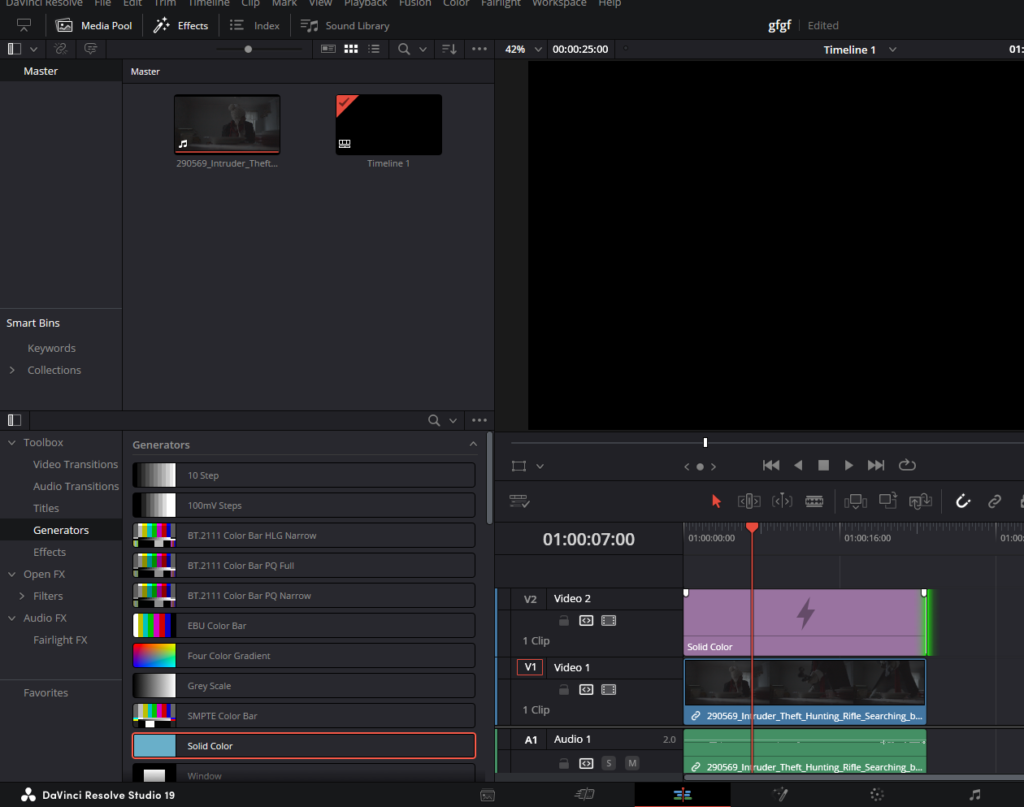
- Add a Solid Color Generator:
- Go to the Edit page in Davinci Resolve, Click on the Effects tab located at the top left of your screen.
- Navigate to Generators and drag the Solid Color option onto a new track above your video layers. Extend this layer to the end of your video timeline.
- Position the First Black Bar:
- With the solid color layer selected, click on the Inspector (found in the top right corner).
- In the Inspector, click on Settings and then go to Transform.
- Find the Y position setting and drag it down. I usually set this to -900—but feel free to tweak it to suit your project.
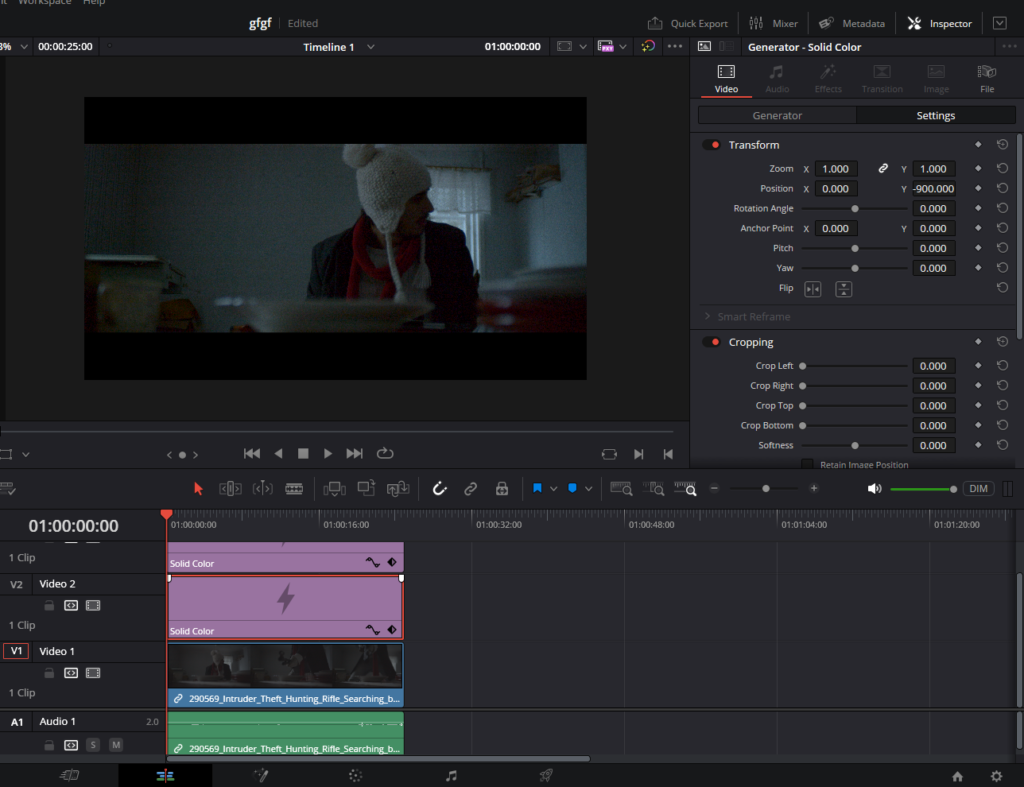
- Duplicate for the Opposite Side:
- Hold Alt (or Option on a Mac) and drag the Solid Color layer upwards to duplicate it.
- Select the duplicated layer, head back to Transform in the Inspector, and change the Y value to +950.
And there you have it! Two black bars appear on your video. I even like to spice things up with a basic transition (try the Film Strip transition from the Video Transitions menu).
While this method gives you flexibility, remember that it can get a bit labor-intensive if you’re applying the effect across multiple clips. So, if you’re looking for a quick fix, you might want to consider the next method.
Method 2: Output Blanking
Ah, output blanking—the DaVinci Resolve gem that makes your life so much easier. This method is my personal favorite for standard projects because it’s fast, fuss-free, and applies the cinematic effect to the entire timeline in just a few clicks.
Step-by-Step Instructions:
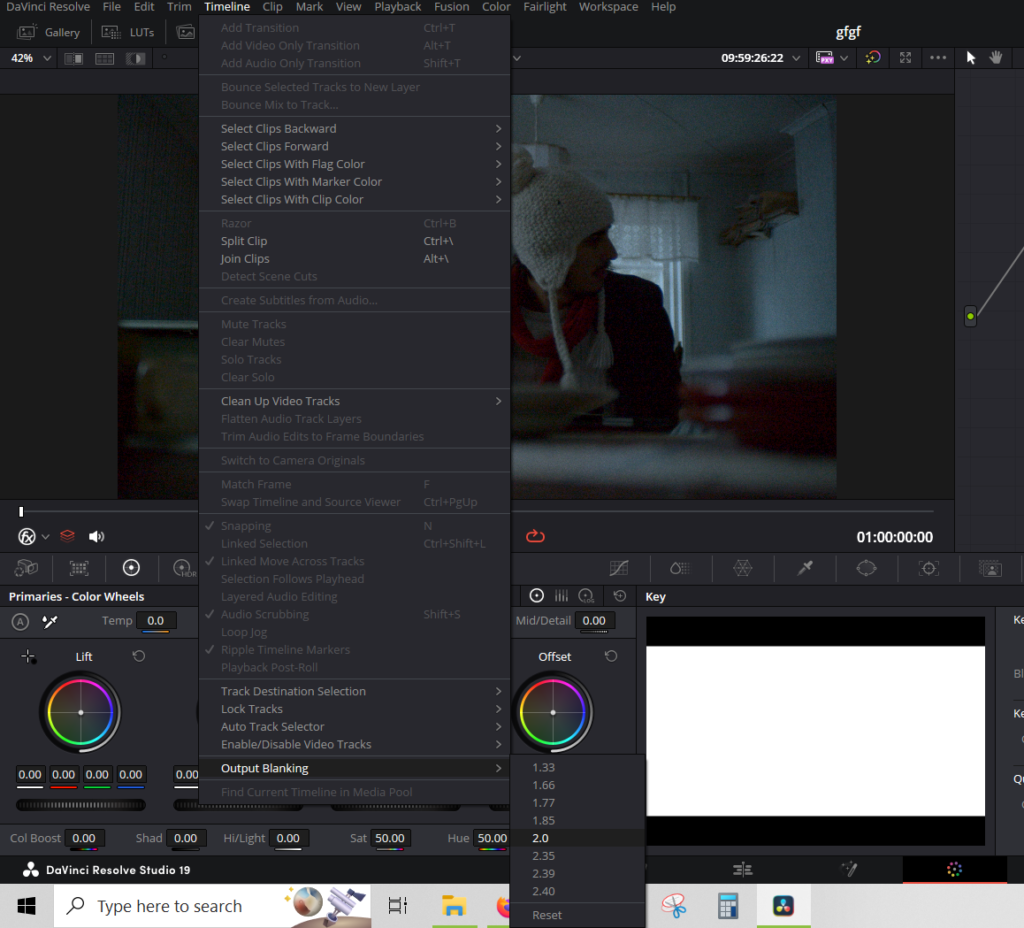
- Navigate to Output Blanking:
- Go to the Color Page of Davinci Resolve. From the menu on the top select Timeline, and locate the Output Blanking option.
- Click on it to reveal a list of frame aspect ratios.
- Select Your Desired Aspect Ratio:
- For that epic widescreen look, simply select 2.35 (or whichever ratio best suits your creative vision).
- Instantly, DaVinci Resolve applies the corresponding black bars across your entire timeline—no extra layers or keyframes required!
- Know the Limitations:
- Keep in mind that output blanking is a global effect on your timeline. This means that every clip in your project will have these black bars applied.
- Even if you try to disable any additional effects you might have added (like the solid color layers from Method 1), output blanking will still be in place.
Method 3: Cropping the Canvas
This method is a bit of a curveball and is ideal if you’re working on projects where file size or device-specific presentation matters. By cropping the canvas itself, you’re effectively reformatting your project’s resolution. However, a word of caution: while this method might save data and work great on certain devices, it may not be accepted on all platforms.
Step-by-Step Instructions:

- Access Project Settings:
- Click on the Timeline Settings (or Project Settings) found at the bottom right of your screen.
- Adjust the Resolution:
- You’ll see your current timeline resolution, which is likely set at 1920×1080.
- To get a 2.35 aspect ratio, take the width (1920) and divide it by 2.35. Punch that into your calculator, and you should get roughly 817.
- Change the timeline’s height from 1080 to 817. Voila! You’ve cropped the canvas to a cinematic ratio.
- Zoom and Reframe:
- Since you’ve cropped the canvas, you might need to zoom in a bit to fill the frame.
- Simply select your video clip in the Edit Page of Davinci Resolve, head back to the Inspector, and adjust the zoom values.
- Play around with the framing until it looks just right on the preview window.
Happy editing, and may your color grades always be on point!
- Also Read: Cinematography Analysis Of Rome, Open City (In Depth)
- Also Read: Transcoding In Davinci Resolve: Simplest Guide
Browse Our Cinematography Analysis Glossary
Explore directors, cinematographers, cameras, lenses, lighting styles, genres, and the visual techniques that shape iconic films.
Explore Glossary →