Hello, and welcome to another guide here on Color Culture. I’m Salik Waquas, the owner of Color Culture, a color grading company. Today, I’ll take you through the process of creating a Digital Cinema Package (DCP) in Adobe Premiere Pro.
CREATING A DCP In Adobe Premiere Pro
What Is a DCP?
Before diving in, let’s quickly discuss what a DCP actually is. A Digital Cinema Package (DCP) is essentially a collection of files that allows your film to be shown in a movie theater. If you’re planning to showcase your film at a festival, a theater, or even a competition, chances are, you’ll need a DCP. Theaters have specific requirements that need to be met for the DCP to work, and it can seem intimidating—but trust me, I’ll walk you through it step by step.
Preparing Your File for DCP Creation
Before exporting a DCP from Premiere Pro, you first need to prepare your file. The key here is to ensure you’re working with a high-quality format that will maximize the visual and color fidelity of your final DCP.
- Export a ProRes File: I always begin the DCP creation process by exporting a ProRes file from my editing software.
- ProRes 444: If your source files are 12-bit RAW or another 12-bit log format, export a ProRes 444 file. This retains as much color detail as possible, which is crucial when converting to the MXF format in the DCP.
- ProRes 422: If you’re not working with 12-bit footage, a ProRes 422 file will also work well for DCP export. While it doesn’t retain as much color information as ProRes 444, it’s still a high-quality option suitable for most cinema screenings.
Once you’ve exported your ProRes file, you’re ready to proceed to setting up your sequence in Premiere Pro for DCP export.
Setting Up Your Sequence in Premiere Pro
The first thing you’ll need to do is set up your project correctly. If you haven’t already started editing, you can create a new sequence in Adobe Premiere Pro with the correct settings for your DCP. Here’s how:

- Open Adobe Premiere Pro: If you haven’t done so already, launch the application.
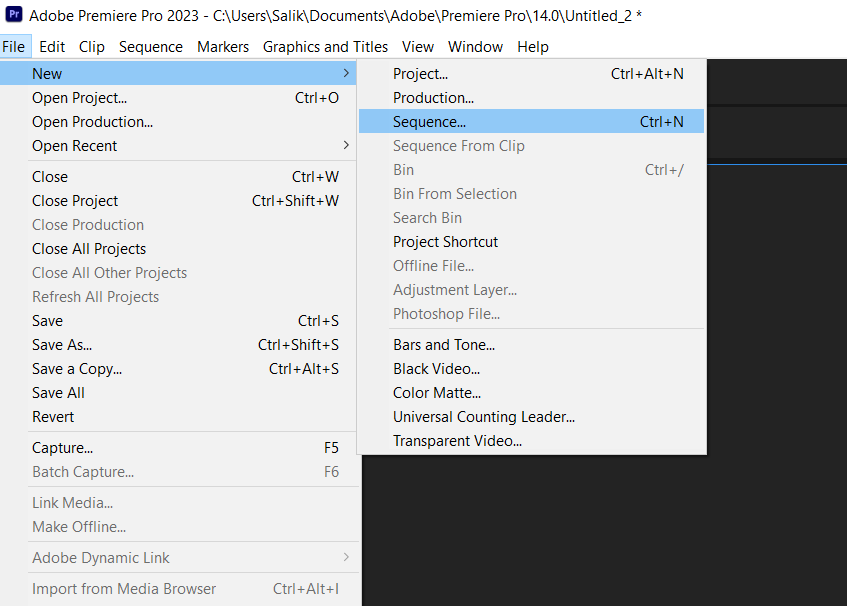
- Create a New Sequence:
- Click on File in the menu at the top left.
- Select New and finally Sequence.
- Edit Sequence Settings:
- In the new sequence window, click on the Settings tab.
- Under Editing Mode, choose Custom. This will allow you to adjust the sequence settings to exactly what we need.
- Time Base: Set the time base to 24 frames per second (fps). This is the standard frame rate for most theaters globally, especially in the United States. While some theaters may support 25 fps (PAL), I recommend sticking to 24 fps to ensure compatibility.
- Set Frame Size:
- Now, let’s move on to the Frame Size. There are two standard aspect ratios for 2k resolution and two for 4k resolutions theaters:
- 2k Flat: Set the resolution to 1998 x 1080 pixels.
- 2k Scope: Set the resolution to 2048 x 858 pixels.
- The aspect ratio (either Flat or Scope) depends on the type of screen in the theater where your film will be shown. It’s always a good idea to check with the theater to know which aspect ratio they prefer.
- Now, let’s move on to the Frame Size. There are two standard aspect ratios for 2k resolution and two for 4k resolutions theaters:
- Pixel Aspect Ratio:
- Set the Pixel Aspect Ratio to 1.0 Square Pixels. This will ensure the image is not stretched or squished.
- Other Settings:
- Ensure that the Display Format for video is set to 24 fps.
- Audio Sample Rate: Set this to 48000 Hz, which is the standard for DCP.
- For Preview File Format, I recommend choosing GoPro CineForm. This provides uncompressed previews, which makes rendering faster and keeps the quality high.
- Save Your Preset:
- Click on Save Preset to save these settings. This will make it easy to create a new DCP sequence the next time you need it.
- ProRes File On Timeline:
- Now that you have successfully created a sequence, drag and drog the ProRes file on the timeline that you prepared for the DCP creation.
Exporting the DCP
Once you’ve edited your film, it’s time to export it as a Digital Cinema Package. Premiere Pro makes this pretty straightforward using the Wraptor DCP export option.
- Open Export Settings:
- Click on File from the top menu.
- Choose Export, then Media.
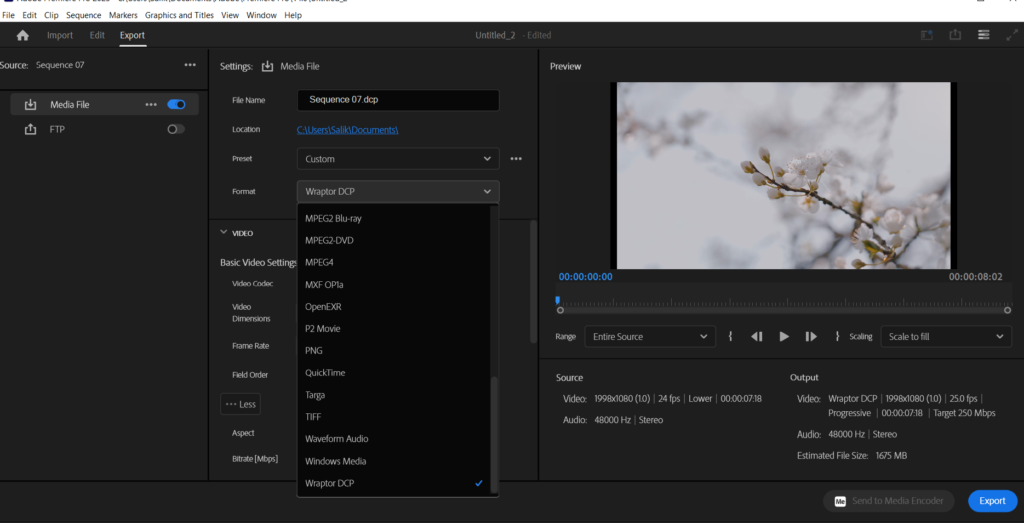
- Choose Format:
- In the Export Settings window, look for the Format dropdown menu.
- Scroll all the way to the bottom and select Wraptor DCP. This is the built-in, free DCP exporter in Premiere Pro.
- Choose a Preset:
- Under Frame Rate, you have two options: 24 fps and 25 fps (PAL).
- Choose 24 fps to ensure compatibility with most theaters.
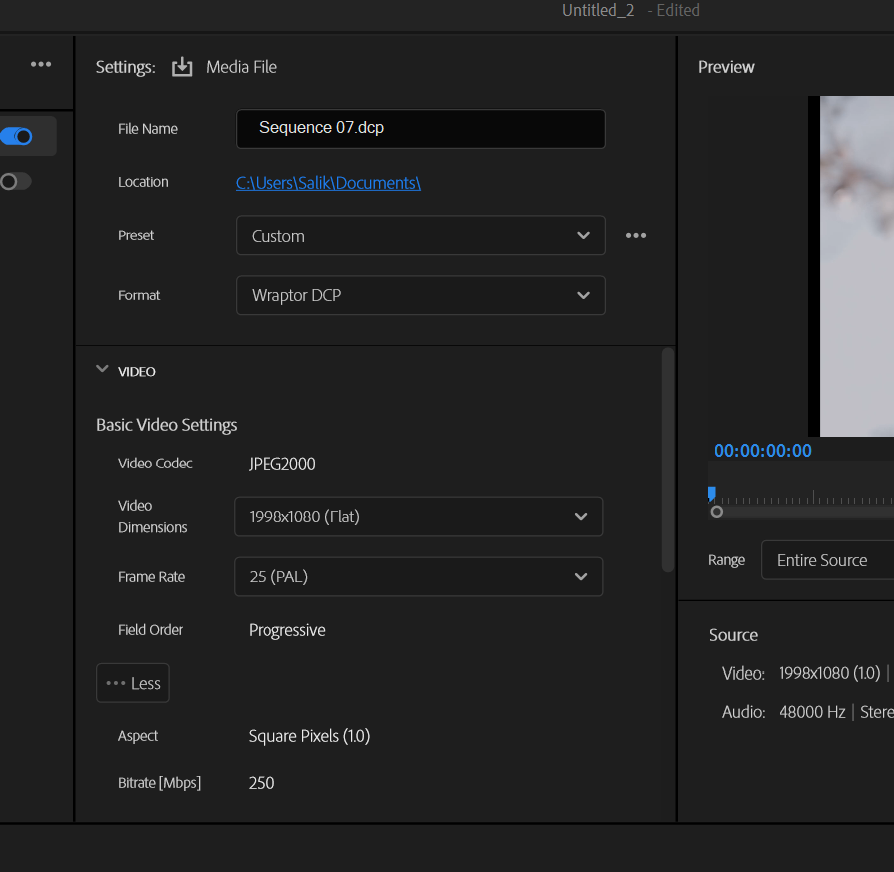
- Video Settings:
- Codec: The default codec for DCP is JPEG 2000, which is supported by all digital cinema servers.
- Dimensions: Double-check the Frame Size you selected earlier.
- Frame Rate: Ensure the frame rate is set to 24 fps.
- Additional DCP Tools:
- If you need a higher resolution, such as 4K, you can explore tools on the QVIS website. This free Wraptor DCP option is limited to standard 2K DCP. However, for most festivals, this is absolutely fine.
- Audio Settings:
- Under the Audio tab, you’ll have the option to choose between Stereo and 5.1 Surround Sound from the Channels drop-down menu.
- If you’ve mixed your film in 5.1, select 5.1 for a richer audio experience. If you only have stereo, then select Stereo.
- Effects and Captions:
- Skip the Effects and Captions tabs since there are no changes required here for a DCP export.
- Exporting:
- Once everything looks good, click on Export to start creating your DCP.
Important Considerations When Exporting a DCP
- File Size: DCP files are large. Be prepared with enough storage on your hard drive. You might need a few hundred gigabytes of free space, depending on the length of your film.
- Testing: Always test your DCP before sending it to a festival or theater. There are software solutions like DCP-o-matic Player or even free trials of EasyDCP that let you verify if everything is in order.
- Hard Drive Format: Theaters often require the DCP to be on an ext2/ext3 formatted drive, which is native to Linux systems. Double-check this with the theater beforehand to make sure they can read your drive.
Tips for a Smooth DCP Creation Process
- Check Theater Requirements: Every theater is different. Before you start creating your DCP, confirm the requirements with the specific theater or festival.
- Aspect Ratio: If you’re unsure which aspect ratio to choose, Flat is often the safer bet. It’s a more standardized aspect ratio that most theaters support.
- Audio Mixing: If you’re not experienced with 5.1 surround sound mixing, consider hiring someone who is. A well-mixed 5.1 track can add a significant level of professionalism to your film.
- Time: Exporting a DCP can take a long time, especially if your project is long. Plan accordingly, as you might need hours—or even a full day—just to complete the export process.
Wrapping It Up
And that’s it! Creating a DCP in Adobe Premiere Pro might seem complicated at first, but if you follow these steps, it’s really not too difficult. Just remember to double-check your sequence settings, choose the right aspect ratio, and make sure your audio is mixed correctly. Once you get the hang of it, making a DCP will become just another part of your workflow.
If you have any questions, feel free to comment below.
Happy filmmaking, and good luck with your DCP!
- Also Read: Transcoding In Davinci Resolve: Simplest Guide
- Also Read: Making DCP In Davinci Resolve: Ultimate Guide
Browse Our Cinematography Analysis Glossary
Explore directors, cinematographers, cameras, lenses, lighting styles, genres, and the visual techniques that shape iconic films.
Explore Glossary →
Thanks for posting. I really enjoyed reading it, especially because it addressed my problem. It helped me a lot and I hope it will help others too.