Hi, welcome back to Color Culture. In this article, we are teaching you how to import media in Baselight. Baselight is a powerful color grading tool used by many industry professionals. One of the essential tasks you need to master when starting with Baselight is importing media. This guide will provide you with clear, step-by-step instructions on importing footage into a scene, allowing you to begin your color-grading journey.
Importing Media In Baselight
Step 1: Launching Baselight
- Open Baselight Application
- To start, launch the Baselight application. You can do this by clicking the Baselight icon on the Linux desktop or within the Baselight Applications group if you are using macOS.
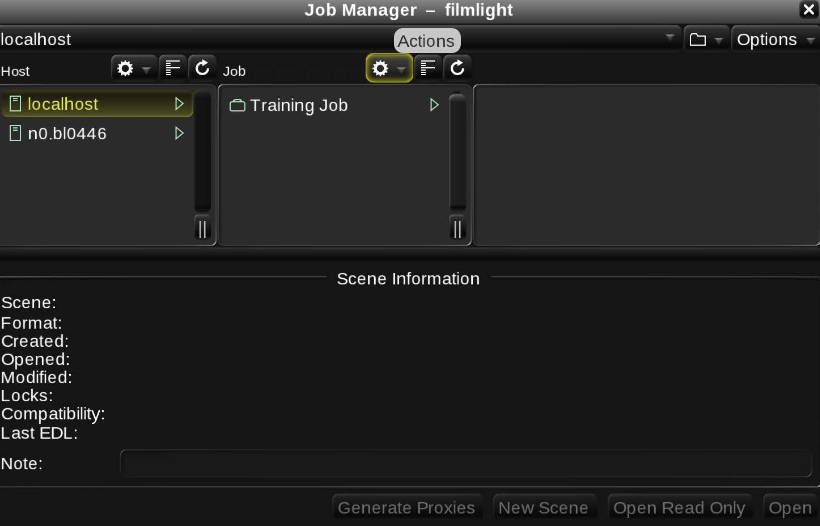
- Access the Job Manager
- Once Baselight is launched, the Job Manager window will open automatically. If it doesn’t, press WIN + J on Linux (CTRL + J on macOS) or select Job Manager from the Views menu at the top of the user interface (UI).
Step 2: Creating a New Job and Scene
- Create a New Job
- Click on the Actions (gear-like icon) button at the top of the Job column in the Job Manager.
- Select New Job.
- Enter a name for the job, such as “My Project,” and press Enter. This job will store all your grading work.
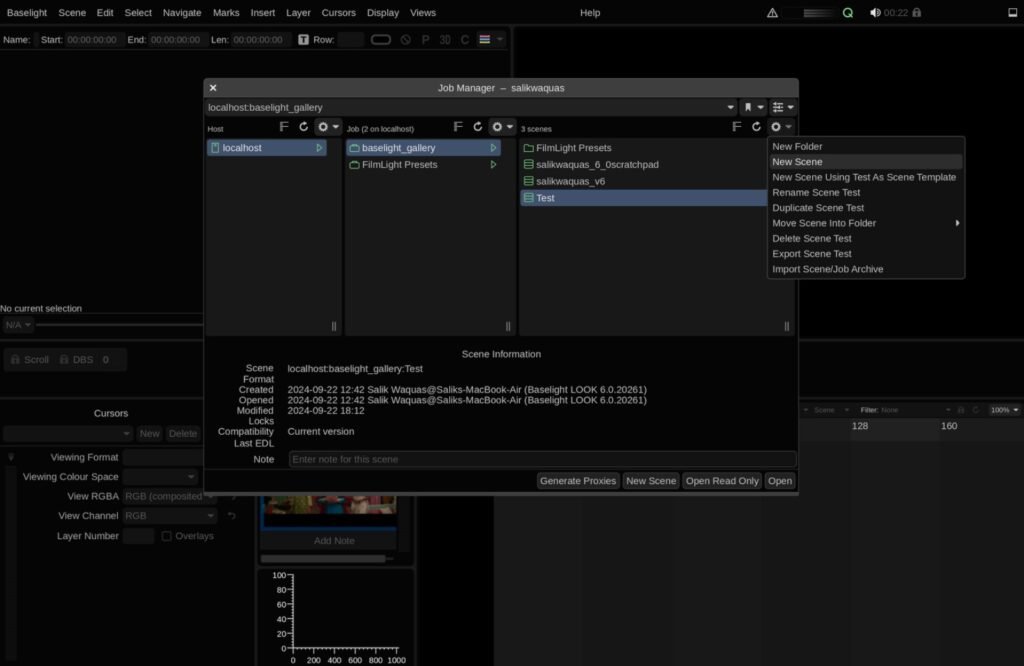
- Create a New Scene
- Click on the Actions button at the top of the Scenes column next to the Job column.
- Select New Scene and enter a name for your scene. This scene will contain the footage you are working on.
- Set the Scene Template and Format
- Select FilmLight Template from the Scene Template drop-down list.
- Set the Working Format to match the resolution of your footage, such as HD 1920×1080.
- Set the Working Frame Rate to match your footage’s frame rate.
Step 3: Importing Footage
Baselight offers two main methods to import media into a scene: manual browsing and using an EDL (Edit Decision List). In this guide, we’ll focus on the manual browsing method.
Using FLUX Manage to Import Media
- Open FLUX Manage
- To start importing footage, open FLUX Manage by selecting it from the Views menu at the top of the screen or by pressing WIN + B (CTRL + B on macOS).
- The FLUX Manage window will open, showing a Browser 1 tab.
- Browse for Your Footage
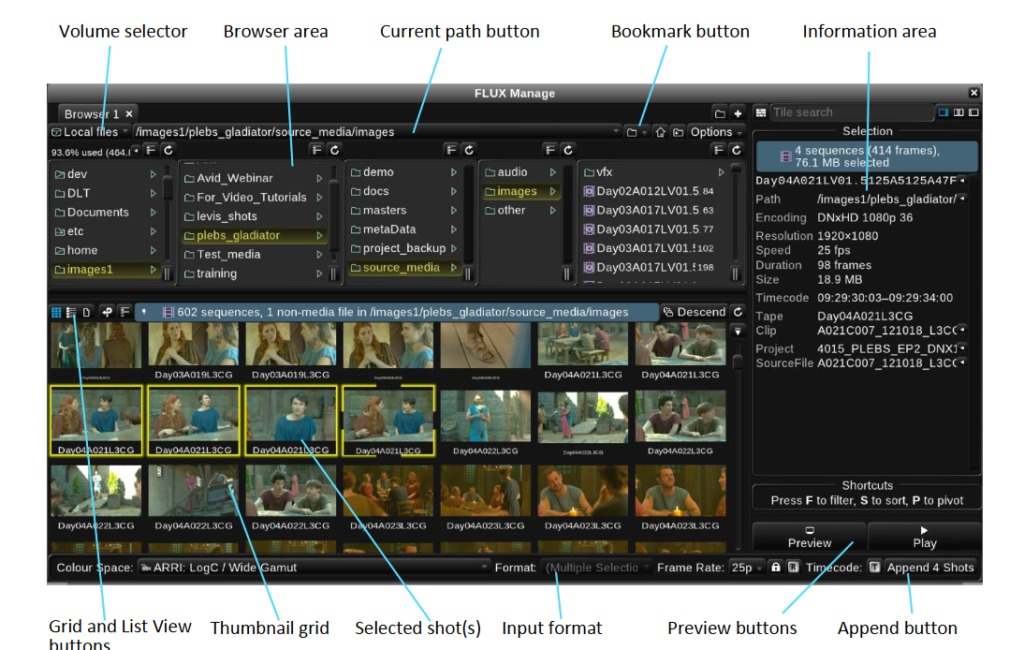
- Click on the volume selector button at the top of FLUX Manage to view the list of available storage volumes.
- Select the volume where your footage is stored. It may be a local RAID storage, a portable drive, or a networked volume.
- Select Media Files to Import
- Browse through the folders to locate your footage. You can see the contents of each folder listed in the browser area.
- Click on the Grid View button to display thumbnails of the media files, which makes selecting footage easier.
- To select multiple shots, hold down the CTRL key (CMD on macOS) and click on additional shots.
- Add Footage to the Timeline
- Once your footage is selected, click on the Append button at the bottom right-hand corner of the FLUX Manage window.
- The selected shots will now be added to the timeline of your scene, ready for grading.
- Close FLUX Manage
- You can now close FLUX Manage by clicking the X button at the top right-hand corner or by pressing WIN + B (CTRL + B on macOS).
Step 4: Using Metadata to Assist with Import
- View and Adjust Metadata
- FLUX Manage provides a metadata area where you can see information related to your footage. This is useful for confirming details like resolution, frame rate, and color space before importing.
- If necessary, you can modify the input color space of shots to ensure Baselight interprets them correctly.
Step 5: Review the Imported Footage
- Playback Footage in the Timeline
- To check your imported footage, you can use the Play Controls or simply press the Space bar to start playback. You can also use X to jump forward and Z to jump backward between shots.
- Zoom and Pan the Timeline
- To zoom in or out of the timeline, hold down the CTRL key (CMD on macOS) and use the middle mouse button. This helps you view your footage in detail and ensure it has been imported correctly.
Step 6: Save Your Scene
- Save Your Scene
- Baselight automatically saves every change, but it is recommended to manually save your scene by pressing CTRL + S (CMD + S on macOS) to create a backup point.
Troubleshooting Tips
- Check Volume Permissions
- If you have trouble accessing storage volumes, check whether your system has the correct permissions for those drives.
- Media File Compatibility
- Ensure that your footage is in a format supported by Baselight. Most common formats are supported, including image sequences and movie files.
- Input Color Space Issues
- If your footage appears incorrectly (e.g., washed out), adjust the Input Color Space in the Input Layer settings to correct it.
That is it! You have successfully imported media in Baselight. Do not forget to follow me on Instagram and if you need any color grading services contact us here.
Also Read: Understanding 3×3 Matrix In Color Grading: Davinci Resolve
Browse Our Cinematography Analysis Glossary
Explore directors, cinematographers, cameras, lenses, lighting styles, genres, and the visual techniques that shape iconic films.
Explore Glossary →