Hey there, I’m Salik Waquas—a seasoned colorist with over 10 years of experience—and I’ve seen my fair share of head-scratching moments in DaVinci Resolve. One topic that has consistently tripped up many of us (myself included, in my early days) is the eternal debate: Video vs Full Data Levels. In this article, I will break it down in plain language and share the hard-earned insights from my time in the grading chair. So grab your favorite cup of coffee (or tea), and let’s get into the nitty-gritty of data levels in Davinci Resolve.
The Basics: What Are Data Levels Anyway?

At its core, data levels in DaVinci Resolve refer to the numerical range used to represent the black-and-white points in your image. You’re presented with three options: Auto, Video, and Full.
- Auto: This is your “set it and forget it” option. Resolve automatically determines the correct levels based on your source media.
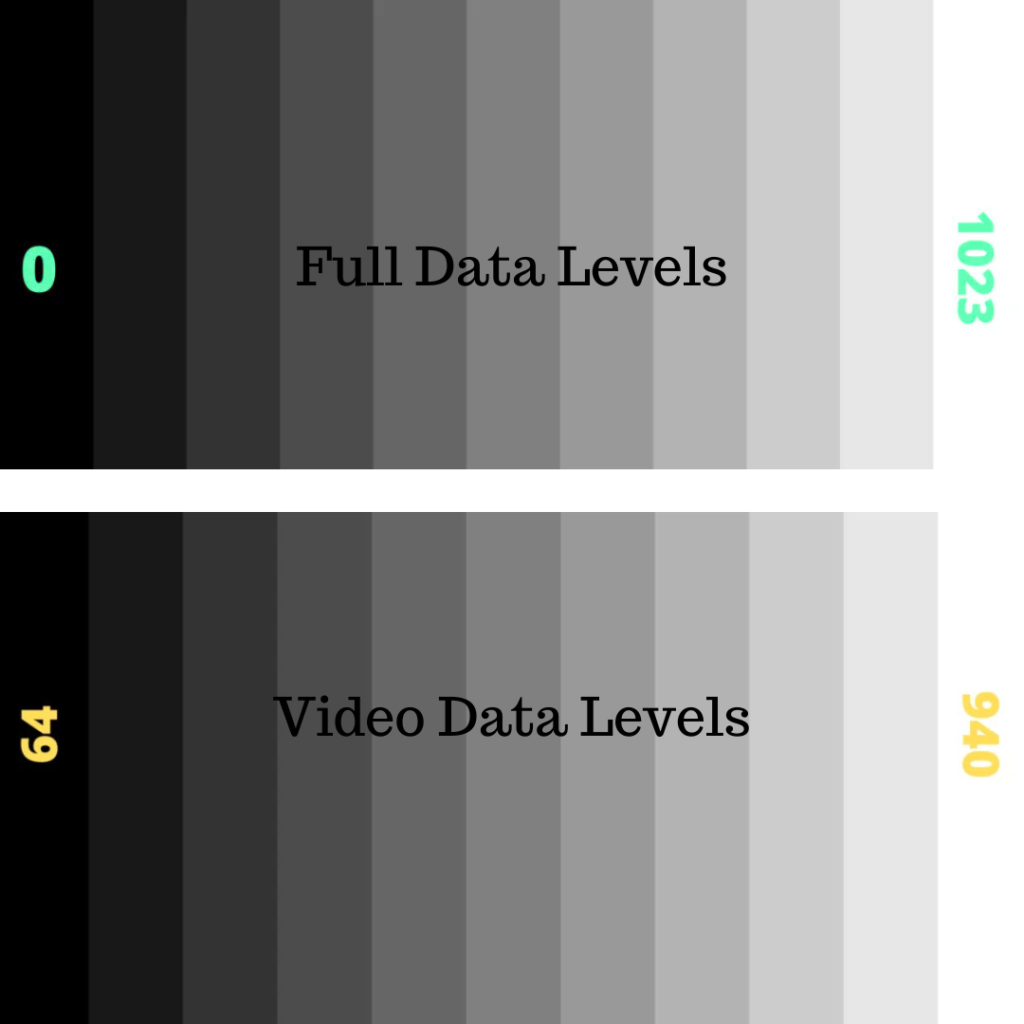
- Video Levels: Here, black is remapped to a value of 64 and white to around 940. This range is a holdover from legacy broadcast standards (think Rec. 709), ensuring compatibility with many traditional video workflows.
- Full Levels: With this option, black is set to 0 and white to 1023. This mode preserves the full range of data—ideal for cinema workflows.
Internally, Davinci Resolve processes every image as full-range, uncompressed, 32-bit floating point data—a detail that guarantees top-notch image quality throughout your grade.
Where You’ll Encounter Data Levels in DaVinci Resolve
1. The Delivery Page
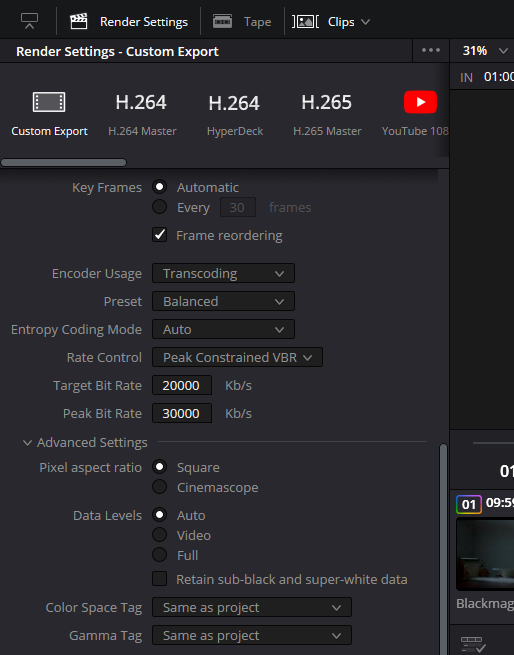
If you’ve ever spent time in the Deliver page, you know that data levels pop up under “Advanced Settings.” Here, you have a options offering Auto, Video, or Full options for your final render. It might seem trivial, but choosing the wrong setting can mean the difference between a perfectly graded shot and one where your blacks look either washed out or overly crushed. Most of the time, I simply leave it on Auto because Resolve knows best—until you’re in a specific workflow that demands a different approach.
2. Project Settings – Video Monitoring
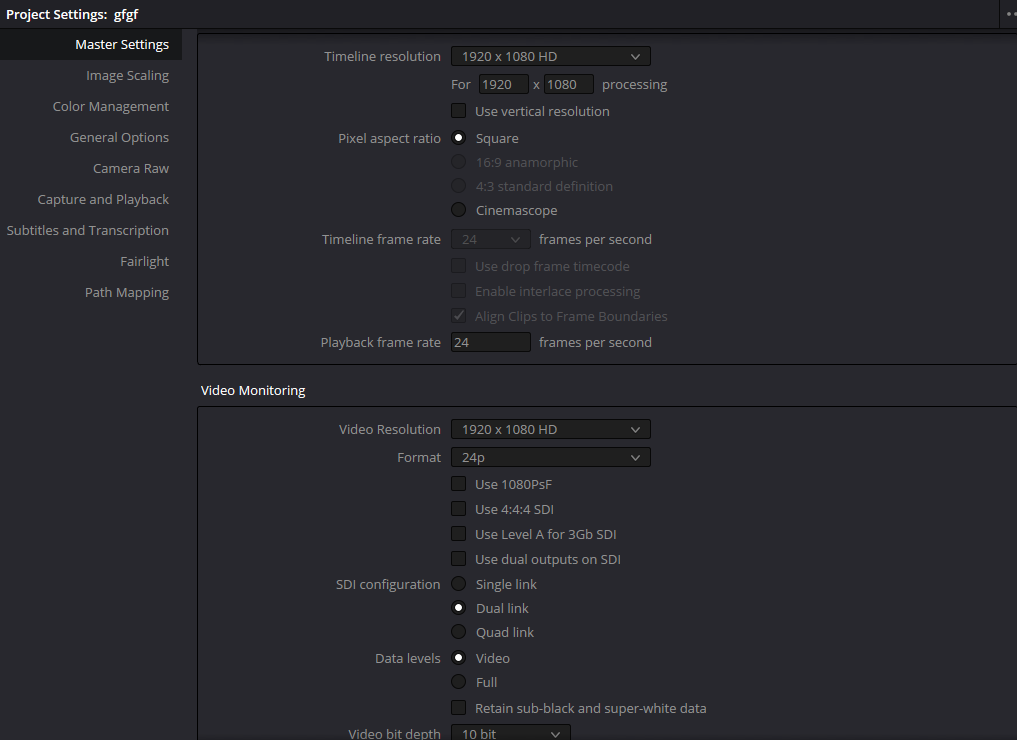
Another common pitfall is the Video Monitoring setting found in the Project Settings. Under the Video Monitoring section, you’ll find a similar toggle between Video and Full levels. Changing this setting affects only what you see on your external monitor—not the internal processing or the final rendered file. For example, if you’re working in a YCbCr pipeline with a broadcast monitor that expects blacks at 64, switching this to Full could make your image appear too deep or even clip your shadows .
3. The Media Pool and Clip Attributes
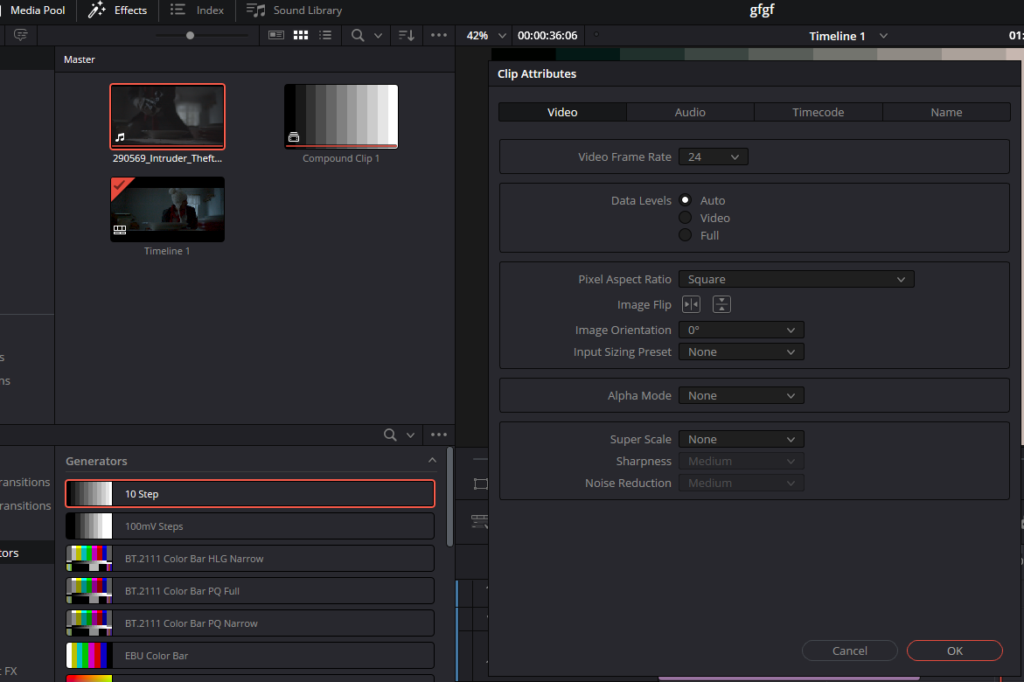
Sometimes, the issue sneaks up on you when you right-click a clip in the Media Pool on the Edit page and select Clip Attributes. Here, you’re given the option to manually adjust the data levels. While this is rarely necessary (since Dvinci Resolve usually auto-detects the correct setting based on the codec), there are cases—especially with transcoded media—where you’ll need to step in and make a manual adjustment to ensure your clip’s levels are interpreted correctly.
The “Why” Behind the Settings: Avoiding the Pitfalls
Imagine spending hours perfecting a grade, only to have your Director complain that the blacks look lifted or that the whites are mysteriously clipped. Frantic internet searches and head-scratching ensue. I’ve been there, and I’ve learned the hard way that in 98% of workflows, you don’t need to mess with these settings at all. The only time I recommend diving into the nitty-gritty is when you’re dealing with specialized pipelines—say, when handing off ProRes 444 files to compositing software like Nuke, which expects a specific interpretation of data levels.
When you override these settings, you’re essentially telling Resolve to deviate from its carefully calibrated automatic mode. And trust me, once you start tweaking, you might inadvertently throw your entire grade off balance. That’s why I say: if you’re not sure, leave it on Auto and let Davinci Resolve do its magic.
When and Why You Might Override Auto
There are a few scenarios where manually setting your data levels can save the day:
Specific Codec Requirements
Some codecs, like ProRes 422 HQ, are designed to work with Video levels (with black at 64). In these cases, regardless of your personal preference, the codec’s inherent limitations dictate the data level. For example, if you render out a file in ProRes 422 HQ and then notice that your shadows or highlights are off, it’s not a mistake on your part—it’s the codec’s way of doing things.
RGB Pipelines and Compositing Workflows
If you’re working in an explicit RGB pipeline, particularly when handing off files to software like After Effects or Nuke, you might need to force full data levels (black at 0, white at 1023) to maintain the correct dynamic range. Failure to do so can result in images that look flat or washed out because the software interprets the remapped black level differently .
External Monitoring Considerations
When setting up your external monitoring, if your display is capable of showing full range video signals, switching to Full data levels can help you see the true extent of your image’s detail. However, be cautious: your monitoring setup must match the chosen data range, or you could end up with inaccurate on-screen representation that doesn’t match your rendered output.
A Deeper Dive
For those who like a bit more technical background (and I do too), the DaVinci Resolve Reference Manual provides some excellent insights into how these settings work. For instance, it explains that:
- Internal Processing: All image data is scaled to full-range 32-bit floating point values, ensuring that no detail is lost in the conversion process. This means that even if you’re working with media originally shot in Video levels, the internal processing is robust enough to handle full-range data .
- Output Data Levels: In the Deliver page, you can choose whether to output your media in Video or Full range. This choice is crucial when you’re exchanging media with other applications. For example, if you’re exporting to a compositing application that expects full-range data, selecting Video levels might clip your blacks and whites, resulting in a loss of detail .
- Monitoring Nuances: The manual also emphasizes the importance of matching your data level settings to your external display. A mismatch here can lead to visual discrepancies—an issue that has cost many a colorist some late-night troubleshooting sessions .
My Workflow and Lessons Learned
Over the years, I’ve developed a workflow that minimizes potential data level mishaps:
- Trust the Auto Setting: In nearly every project, I rely on the Auto setting for both internal processing and final output. DaVinci Resolve is exceptionally good at detecting the proper levels for your media. The days of spending endless time toggling between Video and Full settings are long gone—unless your project calls for something very specific.
- Double-Check Your Monitor Settings: Before diving into a grading session, I always ensure my external monitor is correctly calibrated. If I’m using a broadcast monitor that’s locked to Rec. 709, I make sure my Project Settings reflect Video levels. It might sound trivial, but mismatches here can lead to significant grading errors.
- Manual Tweaks Only When Necessary: There have been times when media from various sources—especially transcoded files—didn’t behave as expected. In these rare cases, I manually adjust the clip attributes in the Media Pool. This targeted approach is far better than globally overriding settings, which can inadvertently affect the entire project.
- Communicate with Your Team: One of the biggest lessons I’ve learned is that color grading is as much about communication as it is about technical precision. Always clarify with your delivery or post-production team what data levels are expected, particularly if your final output will be handled by another application. This simple step can save a lot of headaches down the road .
- Also Read: Add Cinematic Black Bars In Davinci Resolve (Cinemascope)
- Also Read: Cinematography Analysis Of Rome, Open City (In Depth)
Browse Our Cinematography Analysis Glossary
Explore directors, cinematographers, cameras, lenses, lighting styles, genres, and the visual techniques that shape iconic films.
Explore Glossary →