Welcome back to Color Culture, your one-stop destination for color grading services. In this article, I’ll walk you through how to make a Digital Cinema Package (DCP) using DaVinci Resolve. Please note that the DCP creation option is only available with the paid studio version of DaVinci Resolve. It’s a process that, while detailed, can be done affordably at your own workstation. Let’s dive in!
Learn to make a DCP in Davinci Resolve
What Is a DCP?
Before we start, it’s important to understand what a DCP or Digital Cinema Package is. A DCP is essentially a collection of media and metadata files used to project digital movie files in a theatrical venue. It’s called a “package” because it’s essentially a folder containing multiple files, such as separate MXF files for sound and image. A DCP can have one of three possible aspect ratios: Full, Flat, or Scope. Here are the resolutions for both 2K and 4K:
2K Resolutions:
- Native (1.90:1): 2048 × 1080 @ 24, 25, 30, 48, 50, or 60 fps
- Flat (1.85:1): 1998 × 1080 @ 24, 25, 30, 48, 50, or 60 fps
- CinemaScope (2.39:1): 2048 × 858 @ 24, 25, 30, 48, 50, or 60 fps
4K Resolutions:
- Native (1.90:1): 4096 × 2160 @ 24, 25, 30, 48, 50, or 60 fps
- Flat (1.85:1): 3996 × 2160 @ 24, 25, 30, 48, 50, or 60 fps
- CinemaScope (2.39:1): 4096 × 1716 @ 24, 25, 30, 48, 50, or 60 fps
The Flat aspect ratio is similar to the 16:9 ratio of HD or 4K UHD video. Remember, DCP frame rates are true 24 or 30 frames per second, not NTSC rates like 23.976 or 29.97 fps.
Preparing Your File for DCP Creation
To start, I recommend using the SMPTE standard, which has been in place since 2009. I am beginning this process with a ProRes file exported from my editing software.
- ProRes Format: Export a ProRes 444 file if your source files are 12-bit RAW or another 12-bit log format. This ensures the MXF image file in the DCP, which is a 12-bit sequence, retains the best color information.
- You can also export a ProRes 422 file instead.
Color Gamut: DCPs use the DCI-P3 color gamut. If you want the full color range, color grade using this gamut. Keep in mind to grade in DCI-P3 you need to grade either on a projector or a monitor which is calibrated for that. You can also use the Rec. 709 broadcast gamut, as the colors will map correctly to DCI-P3 when creating the DCP.
Audio Specifications: Mix down your audio to a 24-bit 48kHz WAV file. While surround sound (5.1 or 7.1) is the norm, DCPs can support up to 16 channels. Make sure your surround audio is exported in the SMPTE order, and avoid using stereo, as it doesn’t translate well to larger theater settings.
Creating the DCP in DaVinci Resolve
Let’s start by opening DaVinci Resolve. If you’re new to the software, you can complete the quick setup. Don’t worry too much about the initial settings, as you can change them later.
- Create a New Project:
- Click the house icon in the bottom right corner to access the project manager.
- Select New Project.
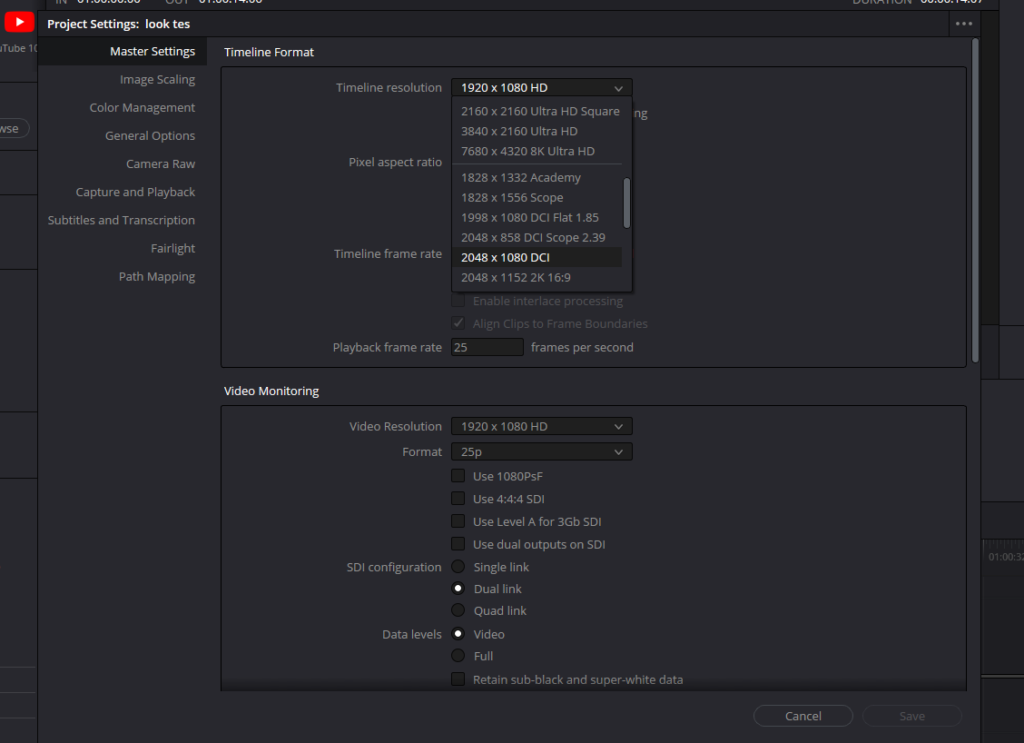
- Set Project Settings:
- Click the gear icon (project settings) at the bottom right.
- Go to Master Settings > Timeline Resolution.
- Set your timeline resolution and frame rate. For this guide, I’m creating a 2K Flat DCP (1998 × 1080) at 24 fps.
- Import Your Media:
- Go to the Media Pool (located in the top left corner).
- Right-click inside the Media Pool and choose Import Media to bring in your ProRes file.
- After importing, click on the file to view its specifications in the metadata panel—verify that the resolution, frame rate, and audio channels match your intended output.
- Create a Timeline:
- Right-click on your imported clip and select Create New Timeline Using Selected Clip.
- Ensure the video starts with 2 seconds of black. DCPs should start and end on black, without any countdown or color bars.
- Check Audio Settings:
- If you don’t see the audio meters on the right, click the mixer button (located at the top right corner) to activate them.
- You need to change the bus format to 5.1. Go to Fairlight (from the menu on top) > Bus Format > Change Bus 1 to 5.1. This ensures that both the track and bus are in surround sound 5.1.
- Check Color Space Settings:
- This is a crucial step. When creating a DCP, DaVinci Resolve converts your Rec.709 or DCI P3 mastered project into the XYZ color space. To ensure the conversion is done correctly, click the gear icon in the bottom right corner to open Project Settings. Then, navigate to Color Management and set both the Timeline Color Space and Output Color Space to either Rec.709 Gamma 2.4 or DCI P3.

Exporting the DCP

- Go to the Deliver Page:
- At the bottom of the screen, click on the Deliver tab.
- Select Custom Export from the top left corner.
- Set Export Settings:
- File Name: Enter the name of the film.
- Location: Choose a location to save the DCP (make a new folder).
- Video Format: Set to DCP and use the Kakadu JPEG 2000 codec.
- Resolution and Aspect Ratio: Match the settings to your timeline; for example, 2K Flat.
- HDR Settings: Leave HDR deselected unless you are certain about its interpretation in theaters.
- Advanced Settings:
- Interop Packaging: Deselect Use Interop Packaging, as this is an older standard. Use SMPTE unless specifically requested otherwise by the venue.
- Maximum Bit Rate: For 2K and 4K DCPs, set the maximum bit rate to 250 Mbps. I recommend slightly lowering this to ensure compatibility.
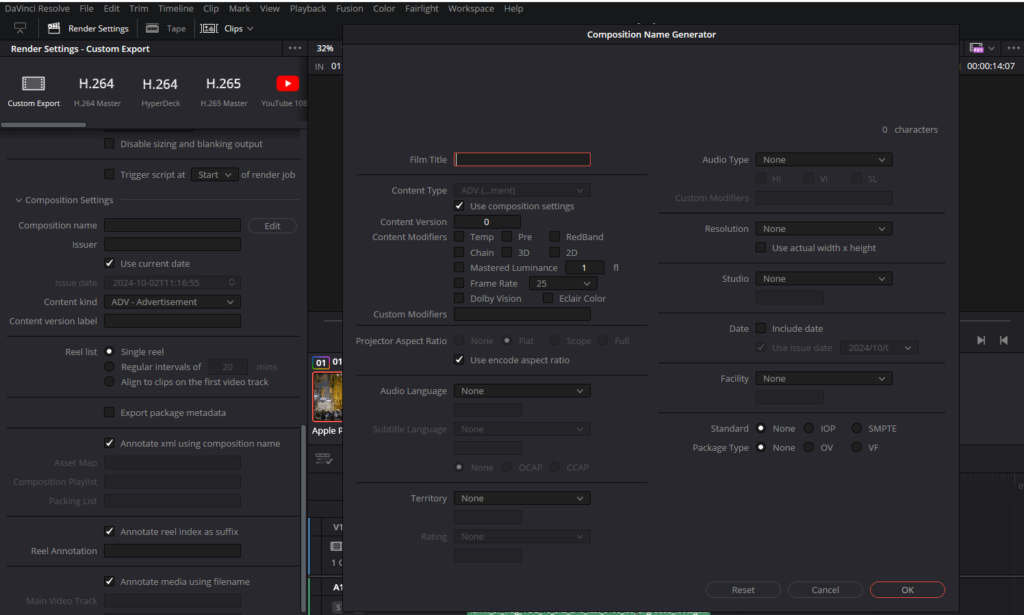
- Essential Composition Settings:
- Click on Composition Settings and click Edit to generate the DCP name following the Digital Cinema Naming Convention (DCNC).
- Enter the movie title, content type (e.g., feature, trailer), frame rate, aspect ratio, audio type, and other metadata. Be as detailed as possible, as this information is crucial for accurate playback and click on Ok.
- Subtitle Settings:
- Under the Subtitle Settings, you can either burn subtitles into the image (which gives you complete control) or include them as a text file within the DCP package. I prefer burning them in to ensure consistency.
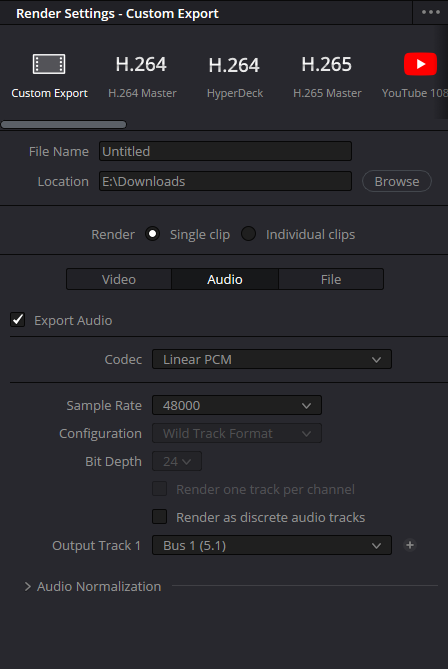
- Check Audio Output:
- Scroll up and go to the Audio tab, set Audio Codec to Linear PCM, with a sample rate of 48 kHz and 24-bit depth. Ensure the audio source is Bus 1 (5.1 output) in the Output Track drop-down menu.
Rendering the DCP
Now that all the settings are configured, add the timeline to the Render Queue and click Start Render.
Note: During the render, the color may look strange on your monitor. This is because DaVinci Resolve shifts the color to the XYZ color space required for DCPs. This is normal, and the color will appear correctly when projected in a theater.
Verification and Delivering the DCP
Once the render is complete, you’ll have a folder containing all the necessary files for your DCP. It’s crucial to verify the DCP before sending it out. I recommend using software like EasyDCP Player Plus to check playback, ensuring everything works as expected.
An easy way to check if the DCP has been created correctly is:
- Go to the Media tab at the bottom (the first tab).
- From the top right corner, select Media Storage.
- Drag and drop your DCP folder into the Media Storage area.
- Head to Project Settings and make sure the Timeline Color Space is set to your mastered color space (either Rec.709 or DCI-P3).
- Play the DCP. If the conversion was done correctly, your film should play normally.
When delivering the DCP, check with the cinema on their preferred delivery method:
- File Transfer: Some cinemas accept DCPs via online file transfer.
- Physical Drive: If you need to ship the DCP, ask about acceptable drive formats. Some servers accept exFAT. You can use Disk Utility on a Mac to format for exFAT, or use specialized software like extFS for Mac to format to ext2/3.
Congratulations! You have successfully created your first DCP. You can now send it to a film festival, arrange a private screening, or use it for distribution. If you encounter any issues creating a DCP in DaVinci Resolve or need color grading services, feel free to contact us.
Also Read: How to Import Media in Baselight (Easy Guide)
Browse Our Cinematography Analysis Glossary
Explore directors, cinematographers, cameras, lenses, lighting styles, genres, and the visual techniques that shape iconic films.
Explore Glossary →