In this article, I’m going to walk you through four methods to color grade S-Log3 footage inside DaVinci Resolve. Don’t worry—no overcomplicated jargon, and no “mystical secret sauce” only experts know. By the end of this read, you’ll know exactly which approach might work best for your project. I’ll keep it straightforward, share some personal insights, and maybe crack a joke or two along the way because, let’s face it, color grading all day without a chuckle is like watching paint dry. So, let’s dive in!
Why S-Log3?
Before we jump into the methods, let’s talk for a moment about why we love S-Log3 so much. Sony’s S-Log3 offers a wide dynamic range, capturing a ton of detail in both highlights and shadows. In short, it gives you enormous flexibility in post-production. It’s kind of like starting with the world’s largest box of crayons—you have every color imaginable ready to shape your vision. But to get those colors popping in a Rec.709 world (the standard display color space), you need to transform that footage. And that’s exactly what we’ll do using four distinct methods.
Method 1: Color Grade S-Log3 Using a Color Space Transform
This method is like having a universal translator for your footage. We’re telling DaVinci Resolve: “Hey, this S-Log3 footage needs to look good in Rec.709. Can you hook me up?” And Resolve says, “Sure thing, pal.”
Step-by-Step:
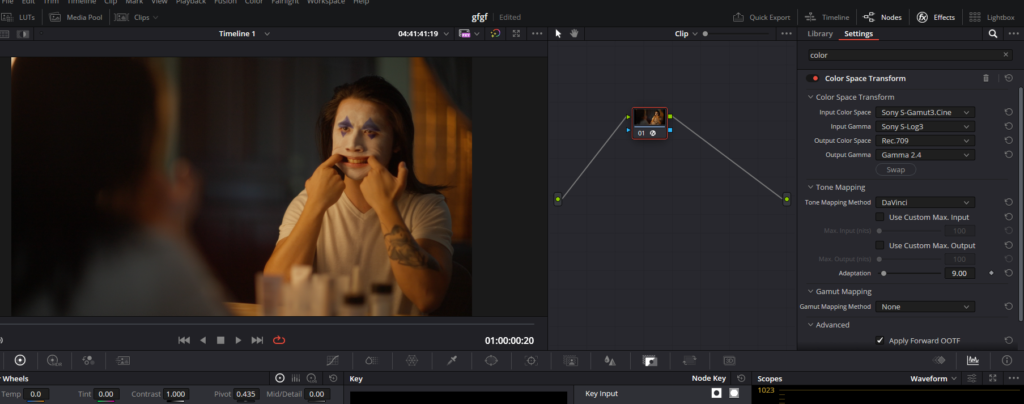
- Load Your Footage: With your DaVinci Resolve project open, ensure that your S-Log3 footage is already in the timeline.
- Go to Color Page: At the bottom of the interface, click on the Color page.
- Create a New Node: On the top-right side of the screen, look for the Node Graph. Right-click on your existing node and select Add Node > Add Serial.
- Open Effects Panel: Click on Effects, on the top-right corner of the interface. Scroll down to find Color Space Transform.
- Drag & Drop the Plugin: Drag the Color Space Transform onto the newly created node.
- Input & Output Setup: In the right corner, set Input Color Space to Sony S-Gamut3.Cine, Input Gamma to Sony S-Log3, Output Color Space to Rec.709, and Output Gamma to Gamma 2.4.
- Fine-Tune the Grade: Congratulations! You’ve got a decent Rec.709 starting point. Now, tweak using the Lift, Gamma, and Gain wheels. If you want more precision, use the Curves tool. Think of it like adding spices to your favorite dish—go easy, taste frequently, and adjust to your liking.
Method 2: Color Grade S-Log3 Using DaVinci Resolve Color Management
If you’re feeling fancy, try leveraging DaVinci Resolve’s internal color management. This method basically says, “Resolve, handle this from the get-go.” It’s perfect if you want a streamlined process without dragging and dropping additional plugins.
Step-by-Step:
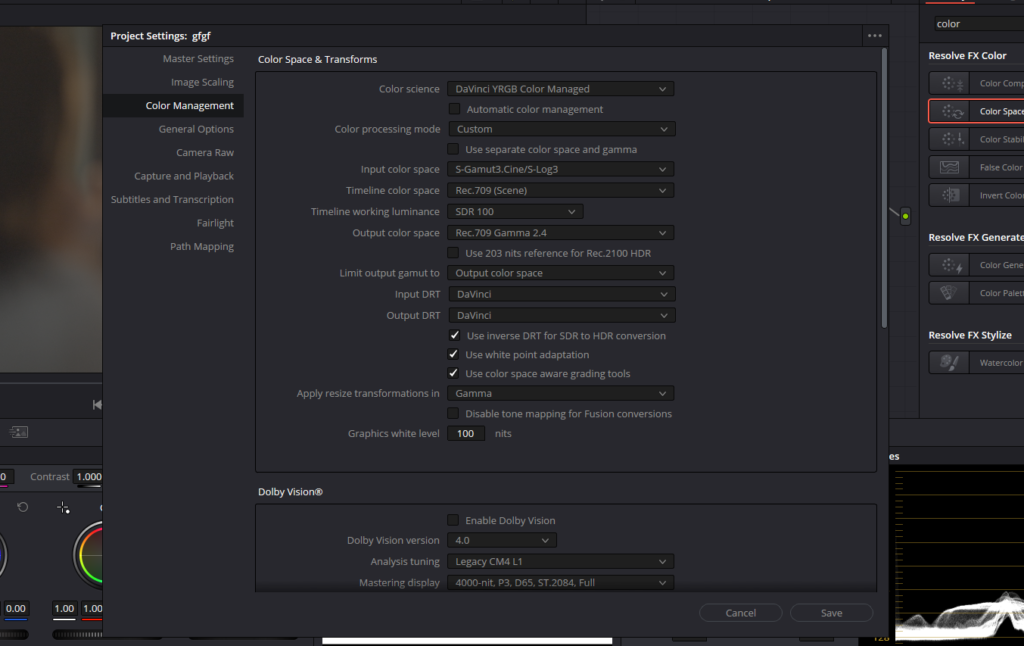
- Open Project Settings: At the bottom-right corner, click the gear icon to open Project Settings.
- Color Management Tab: On the left side, select Color Management.
- Color Science: Pick DaVinci YRGB Color Managed and uncheck the Automatic Color Management box.
- Custom Processing Mode: Choose Custom under Color Processing Mode.
- Define Input & Output Spaces: Select S-Gamut3.Cine/S-Log3 for Input and Rec.709 Gamma 2.4 for Output.
- Save Settings: Click Save at the bottom.
- Refine Your Look: At this point, Resolve will automatically map your S-Log3 footage to a Rec.709 space. It’s like having a personal assistant who sets the stage for you. From here, use your familiar Lift, Gamma, and Gain or jump into Curves to add your personal flair.
This method can be a real time-saver—especially if you’re working on a large project with loads of clips shot in S-Log3. One click, and your timeline already looks half-decent.
Method 3: Color Grade S-Log3 Using ACES
If you’ve heard industry pros toss around the term “ACES” and thought it was some secret handshake, fear not. ACES (Academy Color Encoding System) is basically a standardized way to manage color from capture to delivery. Think of it as the universal language of colorists. Using ACES can give you a more future-proof workflow, especially if you’re dealing with multiple cameras and delivery formats.
Step-by-Step:
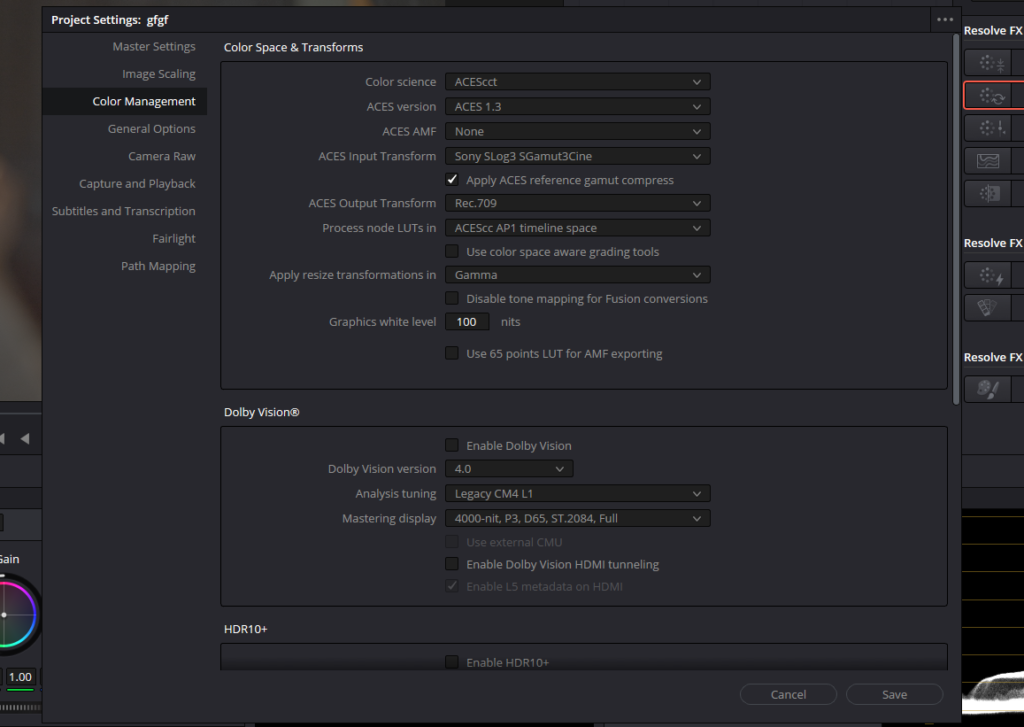
- Open Project Settings: Click on the gear icon (bottom-right) to open Project Settings.
- Color Management: In the left-hand menu, choose Color Management.
- Pick ACEScct: From the Color Science dropdown, select ACEScct and set the ACES Version to ACES 1.3.
- Input & Output Transforms: For ACES Input Transform, choose Sony SLog3 SGamut3Cine; for ACES Output Transform, pick Rec.709.
- Save & Fine-Tune: Click Save. Your footage is now being managed by ACES. If you want to get more nuanced, adjust your nodes the same way you would normally—just remember, you’re now grading in an ACES environment. Lift, Gamma, Gain, and Curves are still your best friends but they will act a little different.
ACES might feel a bit academic at first, but once you get the hang of it, you’ll appreciate the consistency it brings across diverse projects.
Method 4: Color Grade S-Log3 Using a Film Look Creator
Want to add a more stylish touch? Some folks love to give their footage a filmic feel right from the start. If you have a Film Look Creator plugin (or a similar tool) available, this is your ticket to achieving a more “cinematic” vibe without starting from scratch.
Step-by-Step:
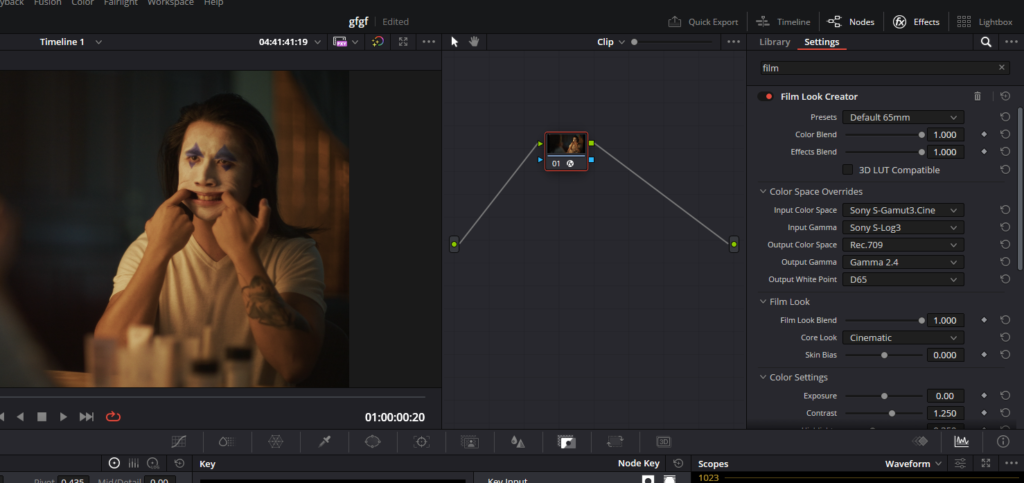
- Load Footage & Go to Color Page: Already have your S-Log3 footage in the timeline? Great. Switch to the Color page.
- Create a New Node: Right-click on your existing node and select Add Node > Add Serial.
- Open Effects Panel: Click on the Effects button (top-right). Scroll until you find the Film Look Creator plugin.
- Drag & Drop: Drag the plugin onto the new node.
- Color Space Overrides: In the Film Look Creator panel (top-right), set Input Color Space to Sony S-Gamut3.Cine, Input Gamma to Sony S-Log3, Output Color Space to Rec.709, and Output Gamma to Gamma 2.4.
- Select a Core Look: Choose a desired “Core Look” from the dropdown menu. This might give you that instant cinematic vibe—a starting point that’s a bit more “Hollywood” than a basic technical transform.
- Fine-Tune & Enjoy: Now adjust as needed and play with different sliders in Film Look Creator plugin to create your filmic look.
So now, you’re armed with four different ways to tackle S-Log3 footage in DaVinci Resolve. Go forth, experiment, and remember—grading should be as enjoyable as watching the final film. Happy grading!
- Also Read: Upscale Video Using Super Scale In Davinci Resolve
- Also Read: Cinematography Analysis Of It’s a Wonderful Life
Browse Our Cinematography Analysis Glossary
Explore directors, cinematographers, cameras, lenses, lighting styles, genres, and the visual techniques that shape iconic films.
Explore Glossary →