Hey there! I’m Salik Waquas, a colorist with years of hands-on experience in the world of post-production. Over the years, I’ve encountered more technical conundrums than I care to admit—one of which has been getting my 5.1 audio exports from DaVinci Resolve. Today, I’m excited to share my guide to exporting 5.1 audio from Davinci Resolve.
Why 5.1 Audio and Why It Matters
Before we jump into the nitty-gritty, let’s chat about why 5.1 audio is a big deal in our industry. Whether you’re delivering content for television, streaming services, or even the big screen, surround sound can significantly enhance the viewer’s experience. When done right, a well-mixed 5.1 track envelops the audience, pulling them deeper into the story.
I remember one project where the director insisted on a 5.1 mix because he believed the immersive sound would add that extra “wow” factor.
The Two Roads to Exporting 5.1 Audio From Davinici Resolve
Sometimes, you get a single, neatly embedded 5.1 file, and other times you receive six separate audio stems (left, right, center, LFE/sub, left surround, and right surround). Each scenario has its quirks, but fear not—I’ve got you covered with two foolproof methods.
Method 1: Exporting a Single Embedded 5.1 Audio File
Let’s start with the scenario where you have one file that already contains the 5.1 mix. In my opinion, there’s something undeniably satisfying about having all your audio channels bundled into one neat package—it’s like receiving a perfectly wrapped present on your birthday!
Step 1: Import Your 5.1 Audio File
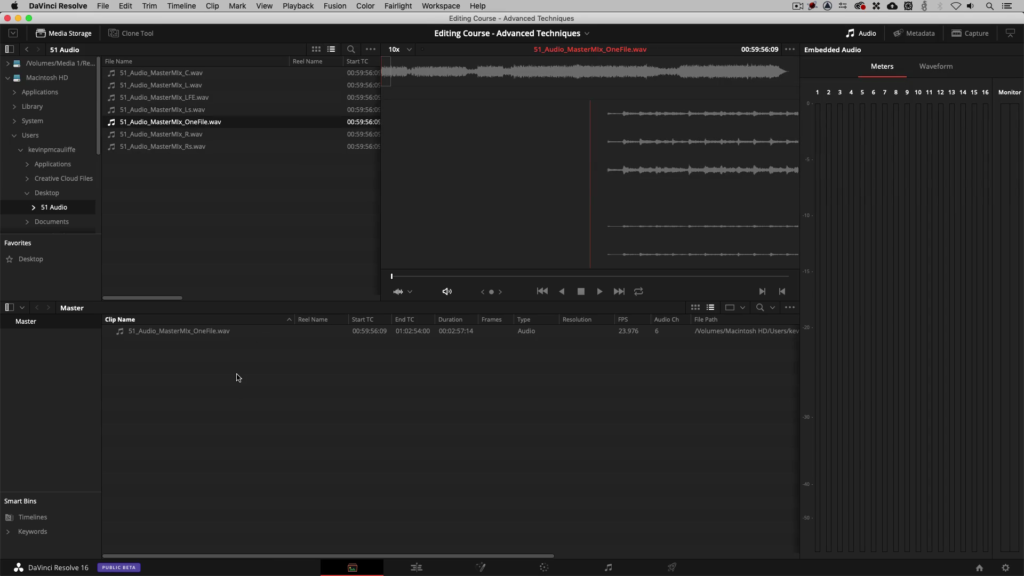
- Open Your Project: Launch DaVinci Resolve and open your project..
- Head to the Media Pool: Look to the bottom left of your interface for the Media Pool tab. This is where you’ll manage your files.
- Drag and Drop Your Audio: Navigate to the folder where your 5.1 file resides.
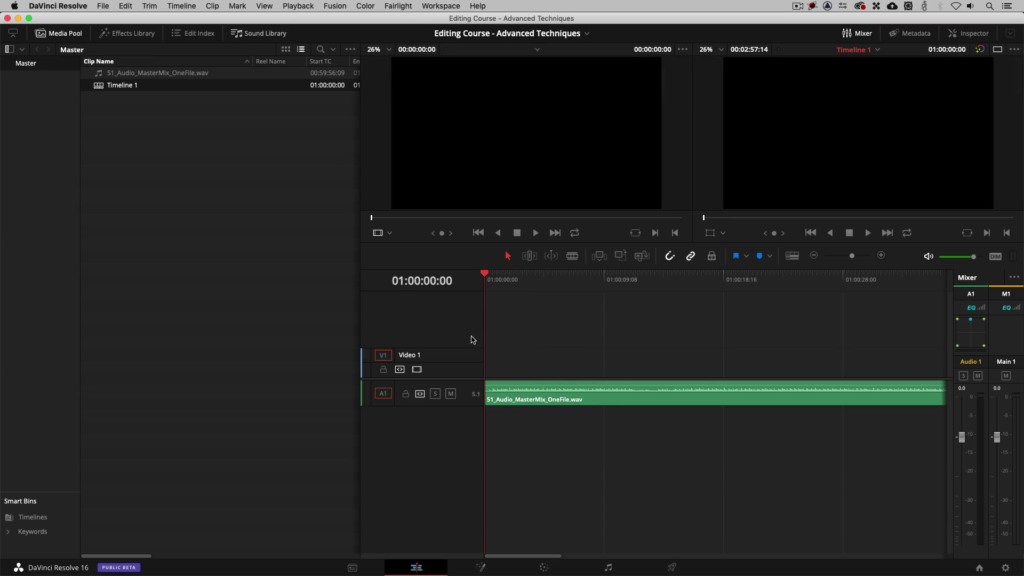
- Place It in the Timeline: Now, go to the Edit page of Davinci Resolve from the tab below. Drag the file from the Media Pool straight into your timeline. At first glance, Resolve recognizes the file as 5.1, but don’t get too excited yet—we need to ensure it exports correctly.
Step 2: Configure the Audio Output
Here’s where things can get a little tricky if you’re not careful. Despite having a 5.1 file, Davinci Resolve’s default settings often stubbornly stick with stereo output.
- Switch to Fairlight: Click on the Fairlight tab at the bottom of the interface (it looks like a musical note).
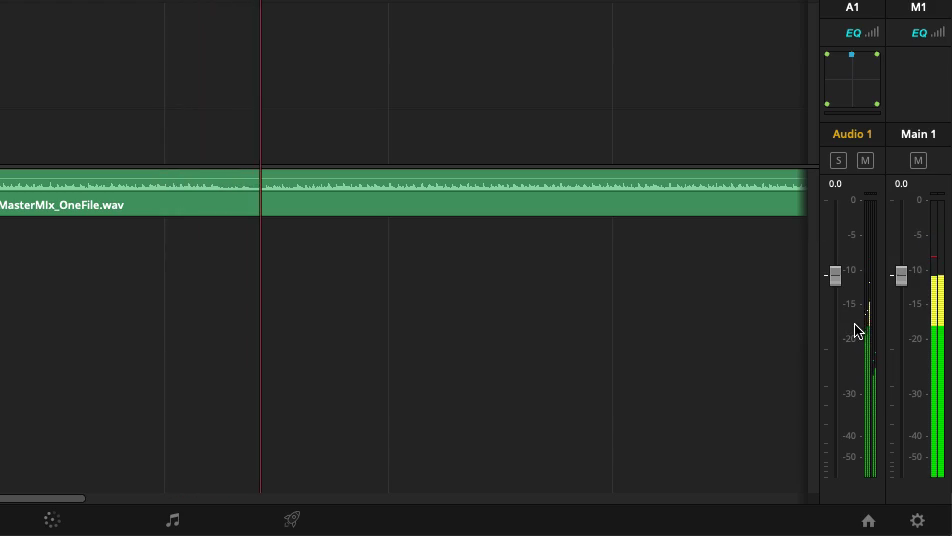
- Check the Mixer Panel: On the right side, you’ll see the Mixer Panel. By default, the master output is set to stereo. I’ve lost count of how many times I almost exported a project only to discover the mix was in stereo!
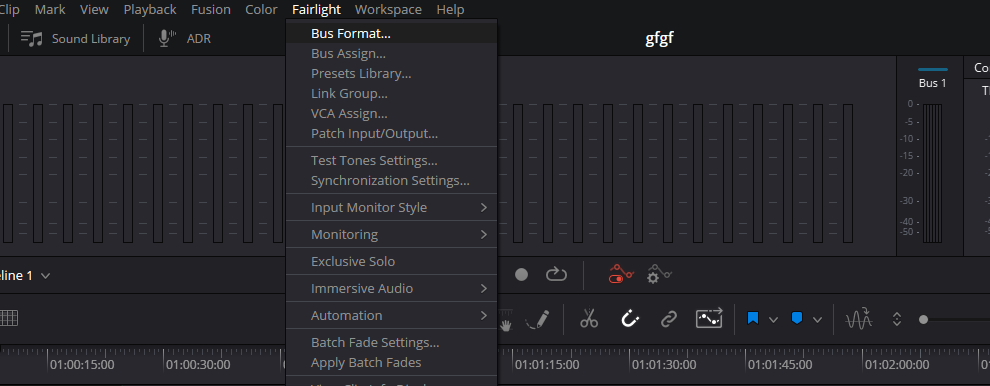
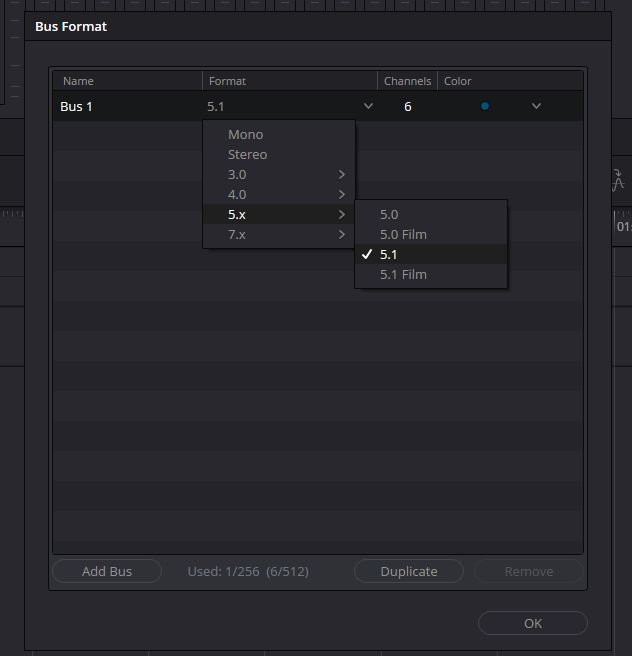
- Adjust the Bus Format: To fix this, go to the top menu and click on Fairlight > Bus Format. A window will pop up, displaying your main output bus settings.
- Switch to 5.1: Change the bus format from stereo to 5.1 using the drop-down menu and click on Ok.
- Double-Check Your Settings: It’s always a good idea to play a short clip in the timeline. If all goes well, you should see activity across all channels, indicating that Davinci Resolve is now treating your file as a true 5.1 mix.
Step 3: Export Your 5.1 Audio
Now comes the part where all that meticulous setup pays off.
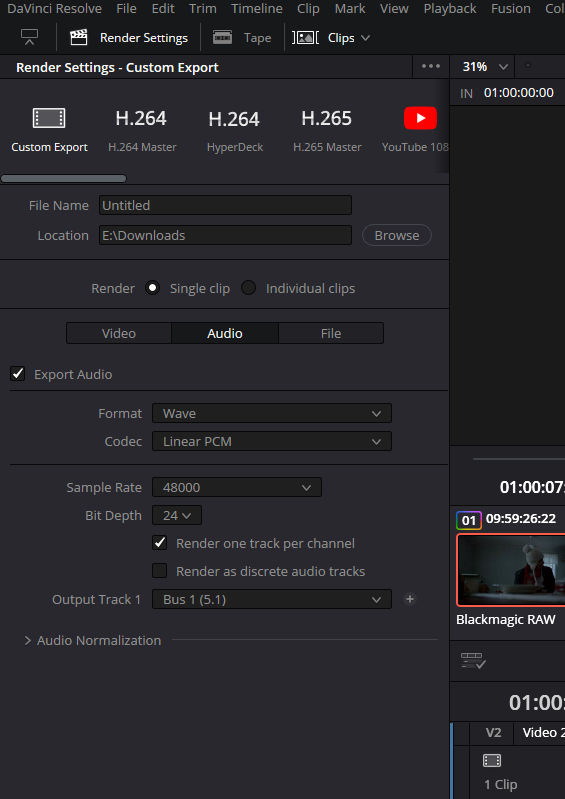
- Head to the Deliver Page: Click on the Deliver tab (rocket-looking icon) in the bottom right corner.
- Configure Audio Settings: Click on the Audio tab on the left side of the Delivery Page. Under the Audio section, change the format to WAV from the drop-down menu. Ensure that the output track is set to 5.1.
- Select Your Destination: Choose the folder where you’d like the exported file to be saved.
- Render the Project: Click on ‘Add to Render Queue’, and then click on ‘Render All’.
Method 2: Exporting Six Individual Audio Stems as a 5.1 Track
Sometimes, life doesn’t hand you a neatly wrapped file. More often than not, especially when working with post houses or mixing for digital cinema, you might get six separate tracks. Think of it as receiving the ingredients for a gourmet meal rather than a pre-cooked dinner. The challenge? You need to combine these ingredients in the right way to produce a harmonious 5.1 mix.
Step 1: Import Your Individual Stems
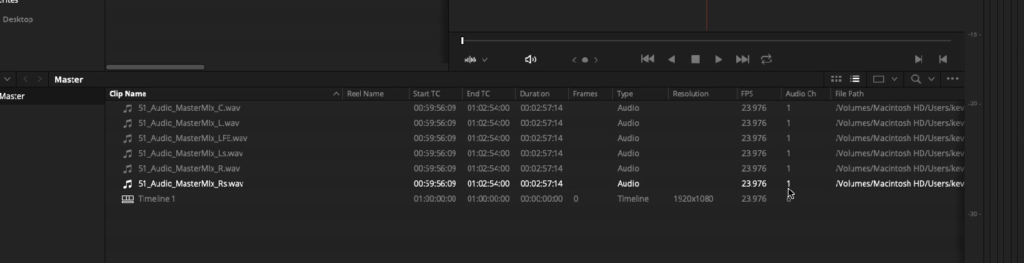
- Gather Your Tracks: In the Media Pool, locate the six separate audio files—each one representing a different channel (left, right, center, sub, left surround, right surround).
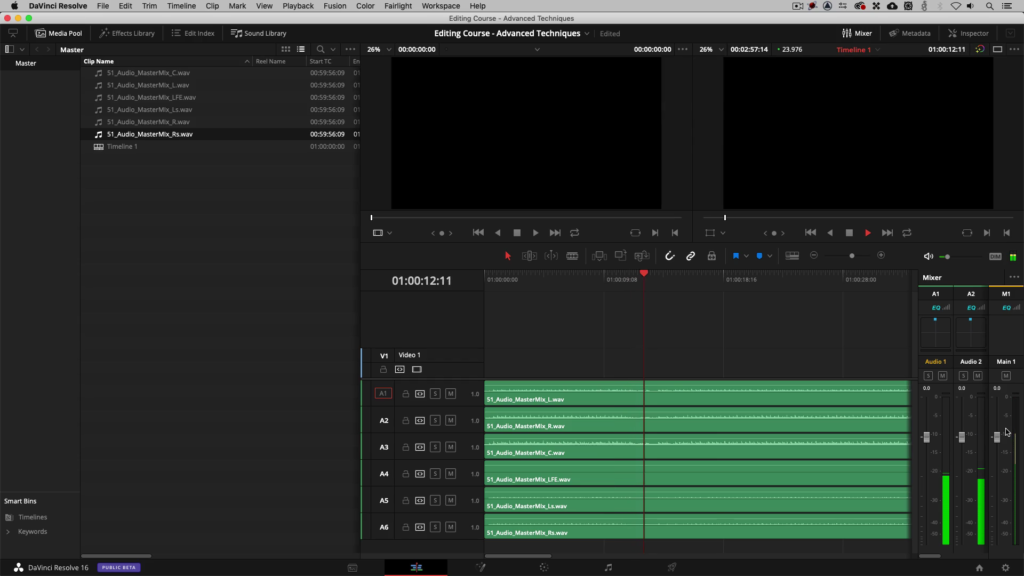
- Drag Them Into the Timeline: Head to the Edit Page of Davinci Resolve, and drop these files into the timeline. Initially, each file will appear as a mono track. In the correct sequence, i.e., left, right, center, sub, left surround, right surround, start dragging these audio files one by one on the audio tracks.
Step 2: Convert the Mono Tracks to a Unified 5.1 Track
Here’s where you turn a collection of lonely tracks into a united front.
- Switch to the Fairlight Tab: Click on the Fairlight tab to access more advanced audio settings.
- Select All Tracks: Hold down the Shift key and click each track to select all six channels. It might take a few tries if your mouse is being stubborn!
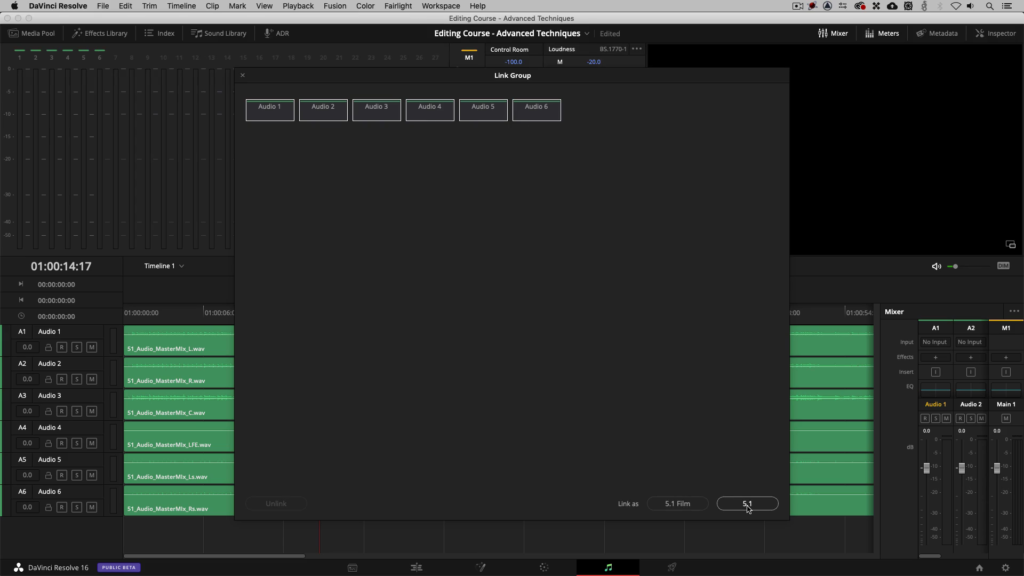
- Link the Tracks Together: Navigate to Fairlight > Link Group in the top menu. This option might initially appear grayed out—if that happens, double-check that you’re on the Fairlight Page. Once you’re there, the option should be active.
- Set the Configuration: In the Link Group dialog, select all the Audio Channels and choose the 5.1 configuration. Essentially, you’re telling Resolve, “Hey, treat these tracks as one cohesive unit.”
- Confirm the Grouping: Click OK, and you should see that the six individual tracks now behave as a single 5.1 audio track.
- Adjust the Bus Format: Now, go to the top menu and click on Fairlight > Bus Format. A window will pop up, displaying your main output bus settings. Change the bus format from stereo to 5.1 using the drop-down menu and click on Ok.
Now that your tracks are linked, exporting is as simple as in Method 1.
This method might seem a bit more labor-intensive, but believe me, when you see all six channels working in perfect concert, it’s incredibly rewarding.
- Also Read: Add Cinematic Black Bars In Davinci Resolve (Cinemascope)
- Also Read: Understanding Video vs Full Data Levels in DaVinci Resolve
Browse Our Cinematography Analysis Glossary
Explore directors, cinematographers, cameras, lenses, lighting styles, genres, and the visual techniques that shape iconic films.
Explore Glossary →