Hi there, I’m Salik Waquas, and as a professional colorist who spends way too many hours inside DaVinci Resolve, I’m always searching for clever ways to squeeze the absolute best quality out of old or lower-resolution footage. One such “secret weapon” that I’ve seen shockingly few people talk about is DaVinci Resolve’s Super Scale feature. It can turn your dusty old 1080p footage into sharp, crisp 4K. Heck, you can even go beyond that and push 4K up to 8K. I know, it sounds like I’m hyping up snake oil, but trust me, this thing actually works, and the results are often jaw-droppingly impressive.
In the world of video post-production, it’s normal to have footage shot at different resolutions. I’ve had clients give me a mix of 1080p, 2K, or 4K clips that all need to be merged into a unified final piece. Without a tool like Super Scale, that means settling for scaling methods that sometimes leave you with mushy details and pixellated edges. But with Super Scale, DaVinci Resolve basically uses a well-crafted algorithm—think of it as a pixel wizard—to intelligently upscale your footage without making it look like a retro video game from the ’90s.
Now, before I walk you through the process, let’s talk about what you need. The Super Scale feature comes baked into DaVinci Resolve.
All set? Perfect. Let’s jump right into the step-by-step process. I’ll keep this easy and straightforward—no guesswork required.
Step 1: Setting Up Your Timeline
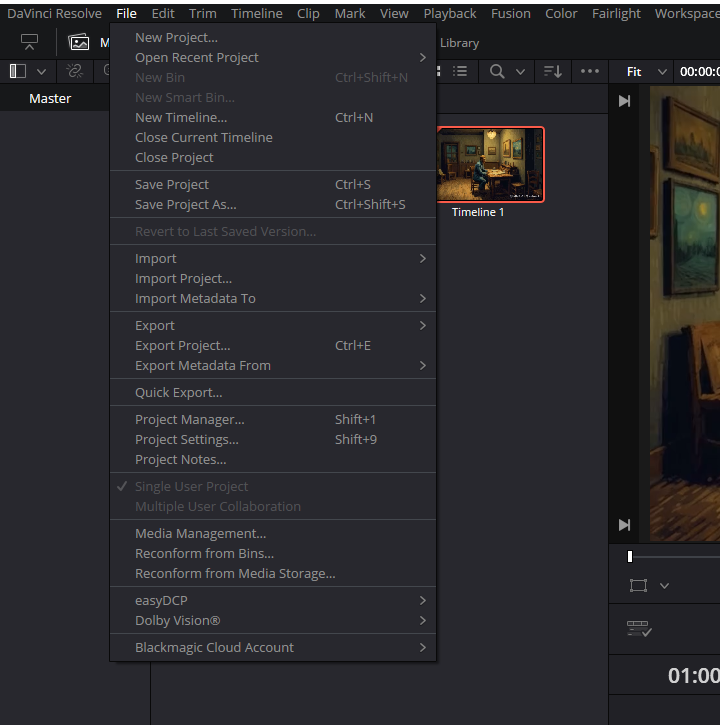
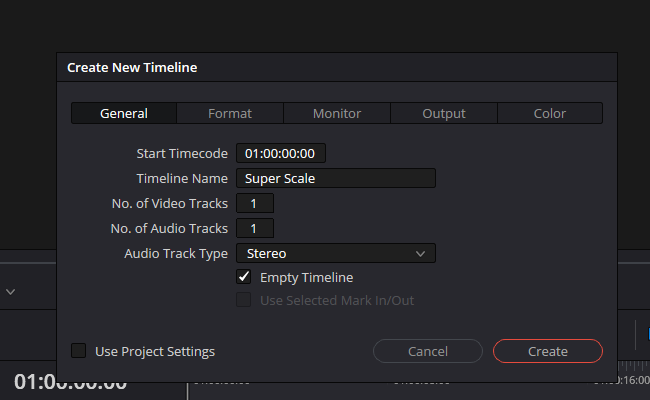
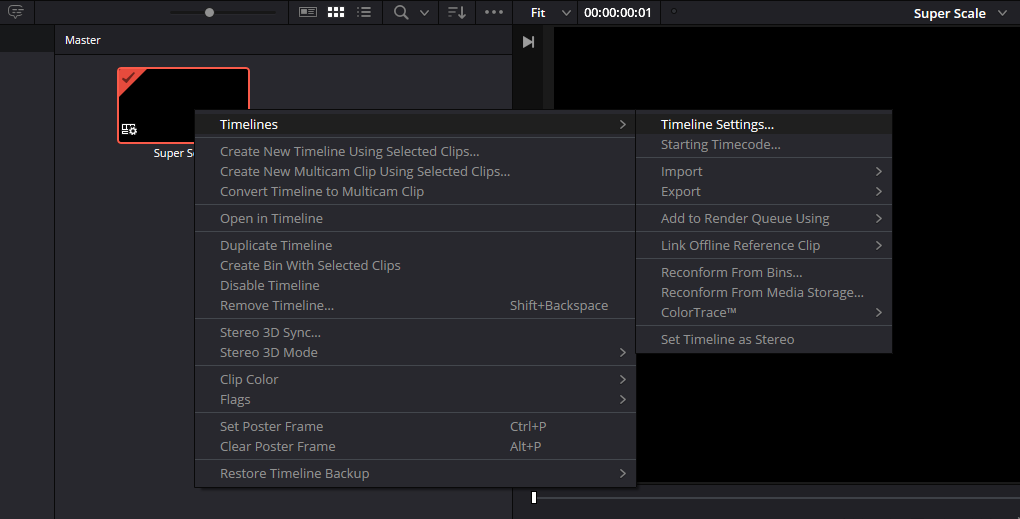
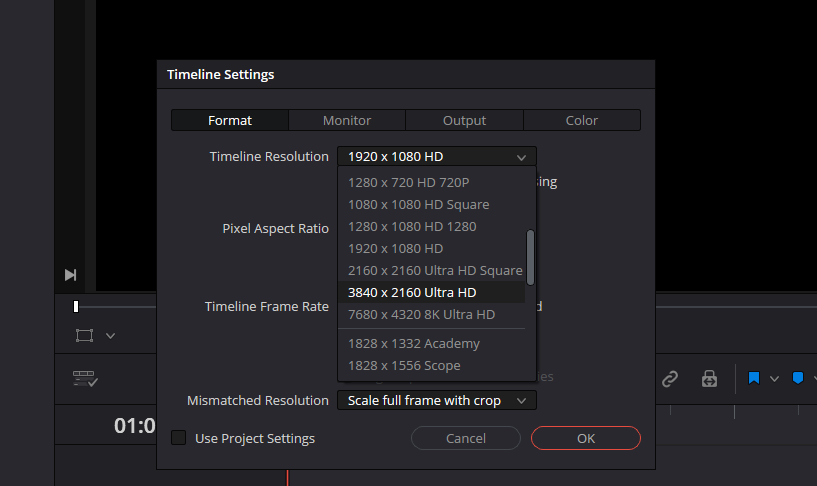
- Open DaVinci Resolve: Fire it up and create a new project or open an existing one where you want to test out Super Scale.
- Import Your Footage: Drag and drop your Full HD (1080p) clip into the Media Pool. For demonstration, let’s say I’m using an old channel intro that I shot years ago in 1080p.
- Create a New Timeline: Click on the File menu at the top left corner, select New Timeline, and give it a fitting name like “Super Scale.” Ensure you uncheck “Use Project Settings” if you want to adjust them individually.
- Adjust Timeline Settings: Right-click on your freshly created timeline in the Media Pool and select Timeline Settings. Now, set the timeline resolution to 3840×2160 for 4K. (If you’re feeling really ambitious and want 8K, just double these dimensions to 7680×4320. But fair warning—your computer might start sounding like a jet engine.)
- Confirm Your Changes: Click OK to lock in those new timeline settings.
Step 2: Applying the Super Scale to Your Clip
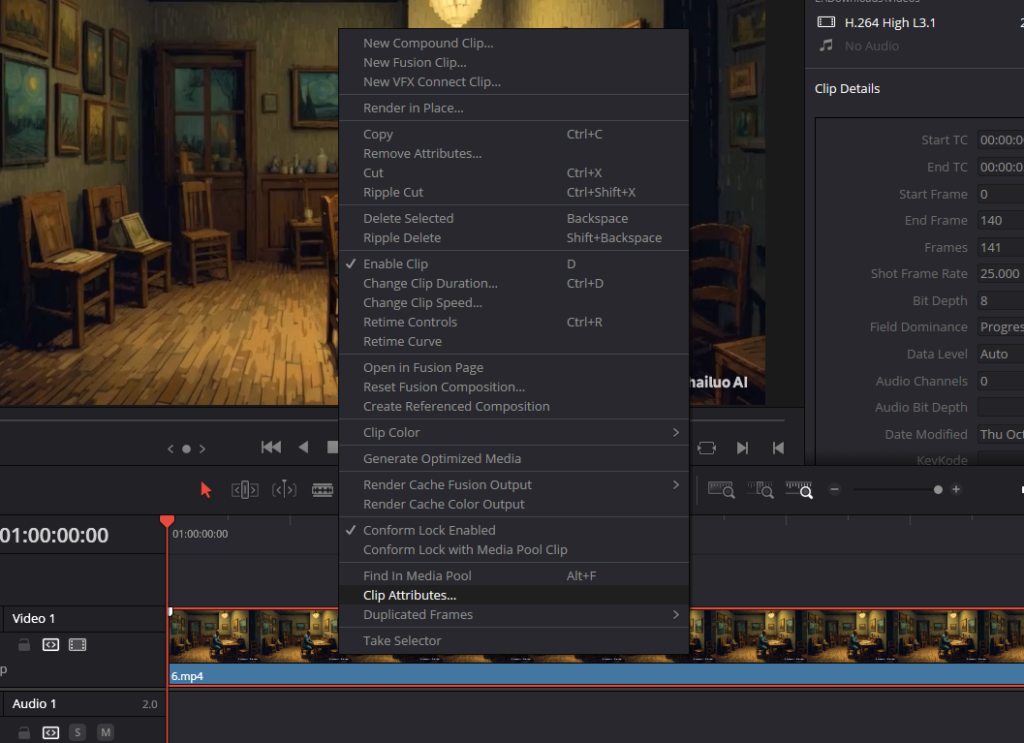
- Add Your Clip to the Timeline: Drag your 1080p clip from the Media Pool directly onto your newly created 4K timeline.
- Open Clip Attributes: Right-click on the clip in the timeline and select Clip Attributes from the dropdown menu.
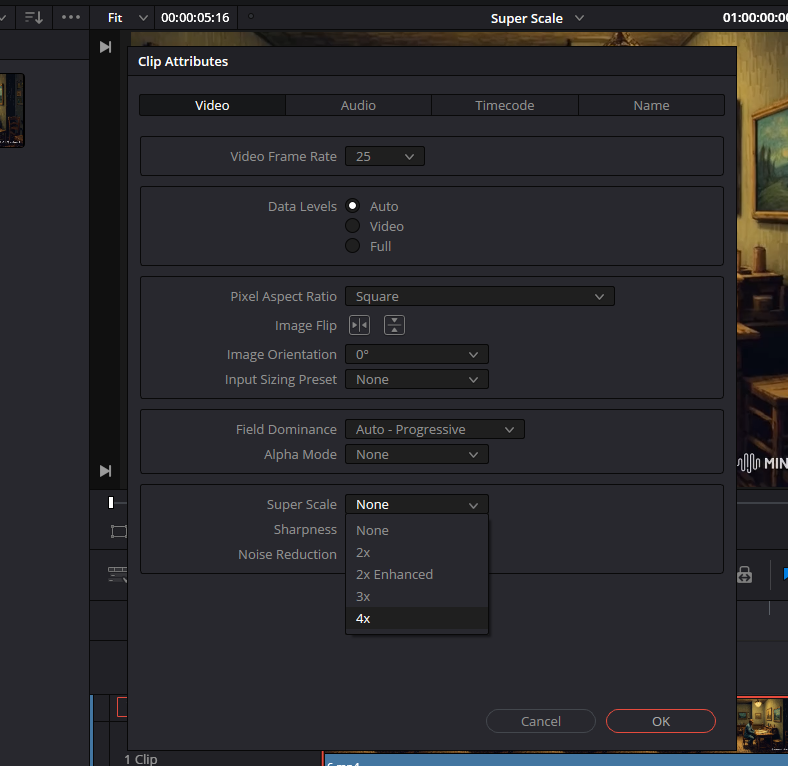
- Find the Super Scale Settings: Look towards the bottom in the Clip Attributes window. There’s a section specifically for Super Scale. You’ll see an option for Super Scale with a dropdown.
- Select the Scale Factor: This might feel counterintuitive, but to go from 1080p to 4K, choose 4x in the Super Scale dropdown. You might think 2x would suffice, but trust me, in Resolve’s math, 4x is what you need for a jump from HD to Ultra HD.
- Adjust Sharpness and Noise Reduction: You’ll see additional settings for Sharpness and Noise Reduction, each with options for High, Medium, and Low. In my experience, setting both to High yields a sharper, cleaner image, but it might look a tad “digital” to some eyes. If you prefer a more natural look, try Medium. Don’t be afraid to experiment—there’s no “one size fits all” here. For my old intro clip, I tend to push both to High because I like a crisp, punchy look.
- Click OK: Once you’re happy with these settings, hit OK to confirm. Your clip is now ready to scale up.
Step 3: Rendering Your Upscaled Masterpiece
- Open the Deliver Page: At the bottom of DaVinci Resolve, click on the Deliver tab (the little rocket icon). This is where you’ll set your export settings.
- Set Your Resolution: Make sure the output resolution matches your timeline resolution (i.e., 3840×2160 for 4K).
- Choose a Format and Codec: For best results, I usually stick with a high-quality codec like DNxHR or ProRes (on Macs), or even just H.264/H.265 if file size is a concern. But if I really want the highest quality possible, I’ll go for a high bitrate format.
- Add to Render Queue: Once you’ve dialed in all your preferences, hit the Add to Render Queue button. The button is on the bottom left corner of the Deliver page.
- Start the Render: Click on Start Render in the Render Queue panel. Here’s where you might want to step away from the computer. Upscaling is a total computational monster. Consider going for a run, making a fancy pour-over coffee, or finally writing that screenplay you’ve been putting off. Seriously, let your machine chug away. The better your hardware, the faster this will go, but don’t be shocked if it takes some time.
- Also Read: Cinematography Analysis Of It’s a Wonderful Life
- Also Read: Cinematography Analysis Of La Dolce Vita
Browse Our Cinematography Analysis Glossary
Explore directors, cinematographers, cameras, lenses, lighting styles, genres, and the visual techniques that shape iconic films.
Explore Glossary →