If you’re looking to import an XML file into DaVinci Resolve, whether you’re bringing in a project from another editing software or relinking media, it’s a straightforward process once you understand the basics. This guide will take you through each step in detail, making it easy to follow even if you’re new to DaVinci Resolve. Written by Salik Waquas, owner of Color Culture, this guide offers insights from years of experience in video post-production.
What Is XML, and Why Import It?

An XML file is a type of data format commonly used to transfer projects between different video editing applications. It contains information about the timeline, media, cuts, transitions, and other important elements of your edit. By importing an XML file into DaVinci Resolve, you can seamlessly transfer an entire project, including edits, from another software like Final Cut Pro or Adobe Premiere.
Importing XML in DaVinci Resolve
Here’s a step-by-step guide on how to import XML files in DaVinci Resolve:
1. Open DaVinci Resolve and Access the Import Option
To start, there are two primary ways to begin the XML import process:
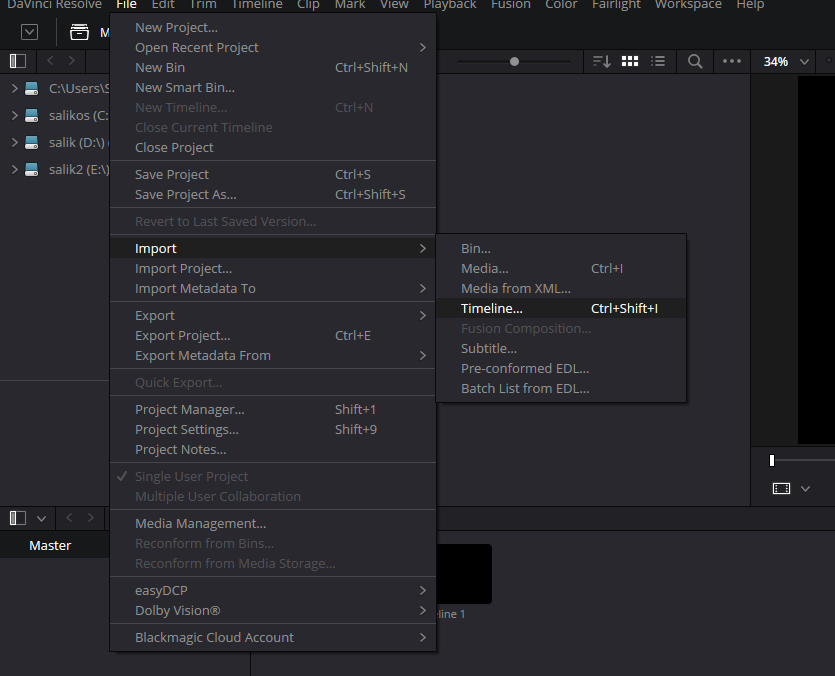
- From any page in DaVinci Resolve, go to the top menu and select File > Import > Timeline. Alternatively, you can use the shortcut Shift + Command + I (macOS).
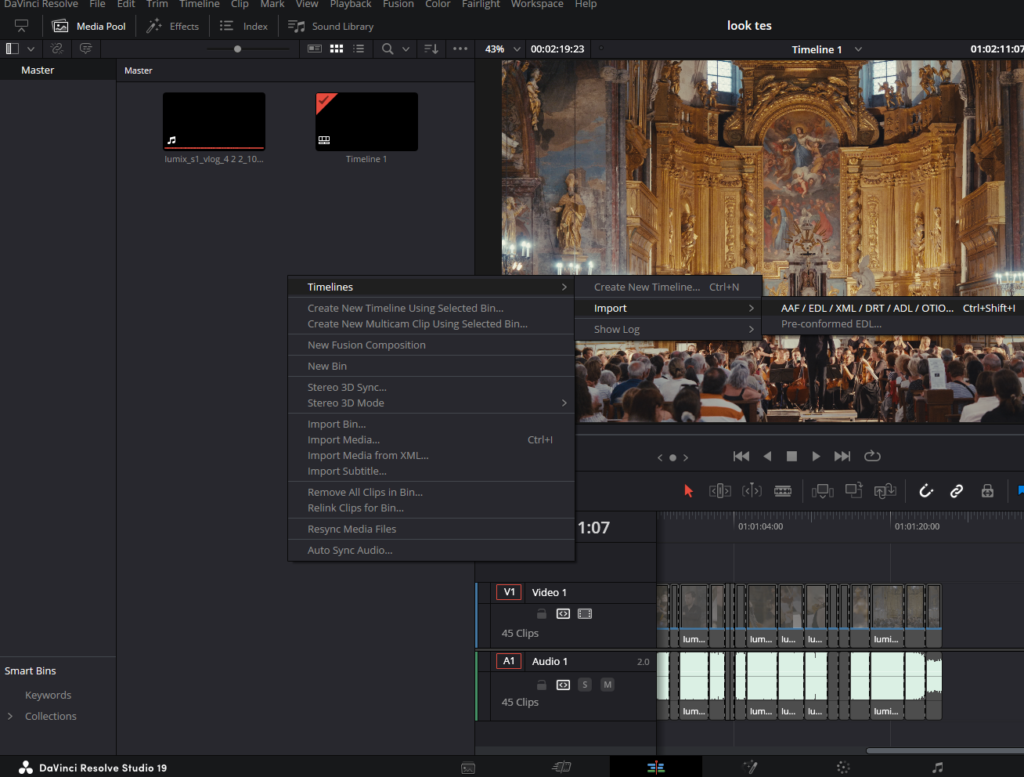
- On the Edit page, right-click anywhere inside the Media Pool, then choose Timelines > Import > AAF/EDL/XML.
2. Select the XML File to Import
After selecting the import option, a file dialog box will appear. Locate the XML file that you want to import, click on it, and then press Open. This will bring up the Load XML dialog, where you can configure several settings based on the specific requirements of your project.
3. Understanding the Import Options
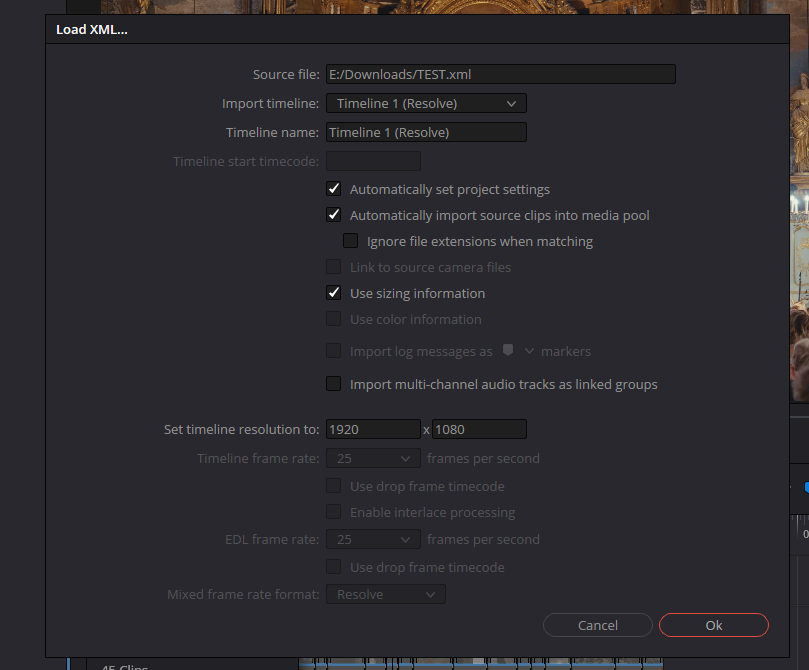
In the Load XML window, you’ll find several options to customize how the XML file is imported. Let’s go through each of them briefly:
- Source File: This shows the file you’ve selected to import. Ensure it’s the correct XML file.
- Import Timeline: If the XML file contains multiple sequences, this option allows you to choose which sequence you want to import as a timeline in DaVinci Resolve.
- Timeline Name: By default, this will match the name of the sequence in the XML file. You can change it if you prefer a different name for the imported timeline.
- Master Timeline Start Timecode: Set the timecode at which your timeline should start. This usually defaults to the start timecode in the XML file.
- Automatically Set Project Settings: This option ensures that the project settings (like frame size and frame rate) in DaVinci Resolve match those in the XML file. You can leave this on if you want an exact match.
- Automatically Import Source Clips Into Media Pool: When this is checked, Resolve will automatically import the media referenced in the XML file into the Media Pool. If the media isn’t found in the expected location, Resolve will prompt you to manually locate the files.
- Ignore File Extensions When Matching: This is useful if you’re importing an XML file that points to media in a different format. For instance, if the XML references lower-resolution proxy files, but you want to link to high-resolution versions, you can use this option to point Resolve to the new directory.
- Use Sizing Information: If the original project has any position, scale, or rotation settings applied to clips, this option allows you to import those adjustments. The settings will be available in the Edit page Inspector.
- Use Color Information: This option is specifically for XML files coming from Final Cut Pro X, allowing you to import some basic color correction data.
- Import Multi-Channel Audio Tracks as Linked Groups: When enabled, audio tracks such as stereo or 5.1 will be imported into individual mono tracks linked together. If disabled, multi-channel audio will remain grouped in the timeline.
- Set Timeline Resolution To: You can set the width and height for your timeline’s frame size. By default, it matches the resolution in the XML file.
- Timeline Frame Rate: This defaults to the frame rate in the XML file. If the media pool already contains clips, the frame rate cannot be changed.
- Use Drop Frame Timecode: This will follow the drop frame settings from the XML file.
- Mixed Frame Rate Format: This lets you choose the method for handling mixed frame rates during playback and rendering. Leave it set to DaVinci Resolve unless your project requires a specific setting.
4. Complete the Import Process
Once you’ve adjusted all the settings, click OK to proceed with the import.
If the media files referenced by the XML are not found in the expected location, or if you opted to ignore file extensions, another dialog box will prompt you to locate the correct folder containing your media files. At this point, you have two options:
- Relink Media: Click Yes, then navigate to the folder where your media is stored. DaVinci Resolve will search all subfolders to locate the necessary files. Click OK once you’ve selected the correct folder.
- Import Offline Timeline: Click No if you just want to import the timeline with the clips showing as offline (useful for later reconform).
It’s possible to repeat this process multiple times if you need to search different folders to find all the media. Once complete, the XML file will be imported, and a new timeline will be created in DaVinci Resolve, along with the referenced media files in the Media Pool.
5. Handling Missing Media
After importing, if some clips are still not found, they will appear in red, indicating that they are offline. You can manually relink these files by right-clicking the offline clips and selecting Relink Selected Clips, then navigating to the correct media location.
Tips for a Successful XML Import
- Organize Your Media: Make sure all media files are properly organized in folders that are easy to navigate. This will save time if DaVinci Resolve needs help finding linked files.
- Match Metadata: If you’re using different versions of the media (e.g., proxies vs. original footage), ensure that metadata matches exactly. This will make relinking much easier.
- Project Settings: Keep in mind that DaVinci Resolve may need to adjust the project settings to match the XML file. It’s a good idea to check your project settings after importing to make sure everything is as expected.
Conclusion
Importing XML files into DaVinci Resolve is an essential skill for anyone working in a collaborative environment or transitioning projects between different editing applications. By following the steps outlined above, you’ll be able to easily bring in your XML files and get to work on editing, color grading, or finishing your project in DaVinci Resolve.
Whether you’re working with proxy files, high-resolution footage, or simply want to ensure that all edits are intact, the XML import feature in DaVinci Resolve provides a powerful and flexible way to continue your work without interruption. To read more amazing articles, head to our blog page.
Browse Our Cinematography Analysis Glossary
Explore directors, cinematographers, cameras, lenses, lighting styles, genres, and the visual techniques that shape iconic films.
Explore Glossary →
Can you write more about it? Your articles are always helpful to me. Thank you!